
Assembling Photographed Views of Cuneiform Tablets with Photoshop
Documenting archaeological artifacts is a crucial aspect of research, as it provides valuable data for both traditional and computational analysis and preservation. A standardized approach to documenting these artifacts enhances their usability, facilitating more efficient data processing and analysis. Additionally, implementing an automated method to streamline this documentation process is vital. Among these methods, photography has become a standard practice.
Cuneiform tablets, as archaeological artifacts, present a particular challenge because the inscribed text must be clearly readable for the preservation method to be useful for any kind of philological or computational analysis.
In this tutorial, we will learn how to combine multiple views of cuneiform tablets - front, back, and sides - into a single comprehensive layout. This creates standardized photographic renderings of cuneiform tablets appropriate for publication, following the presentation style used by the British Museum.
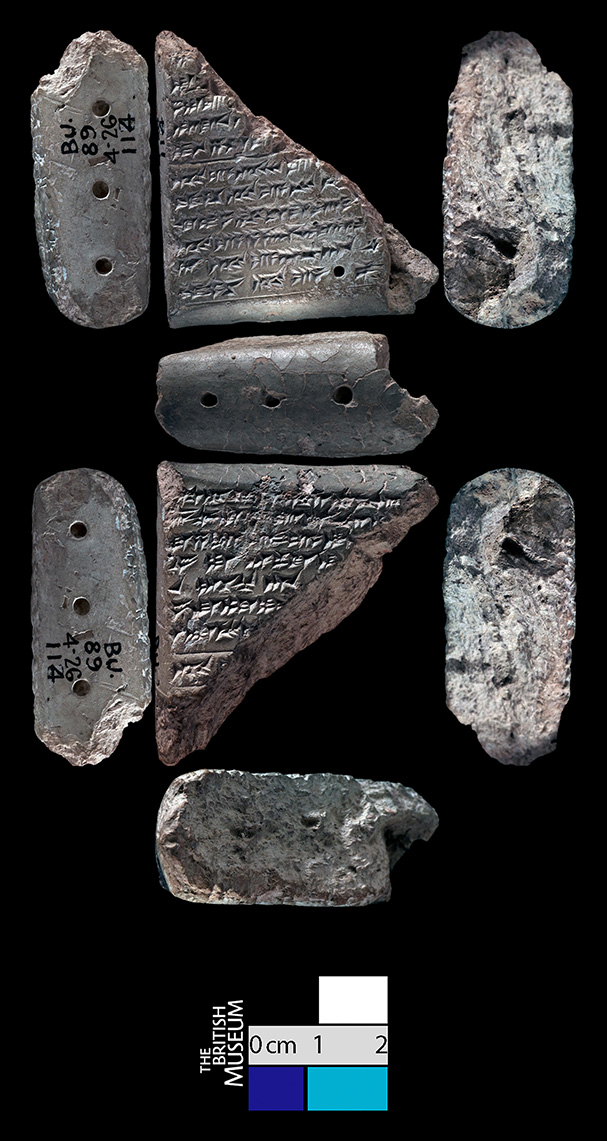
Figure 1: Rendering of the tablet 1889,0426.114 with front, back and side views housed in the British Museum containing extispicy and ritual directions. © The Trustees of the British Museum.
We believe that this is the most cost-effective and efficient way to capture the three-dimensionality of these artifacts and the inscriptions, which often extend to the edges, using a method like photography that can only produce 2D images.
The tutorial focuses on automating this workflow with specialized tools, reducing manual intervention while ensuring consistent, high-quality results that meet professional documentation standards.
This tutorial utilizes two specialized Photoshop components:
- The Photoshop Actions file
Babylon_Project_modified.atn, originally created by Alberto Gianese for the British Museum. - The Photoshop JavaScript
STITCHING_updated_EJ_LH_LS_Jena.jsx, developed by Mathilde Touillon-Ricci and Jonathan Taylor for the British Museum.
These components contain automated sequences that:
- Extract the tablet image from its background
- Place it on a black background layer
- Apply digital processing for stitching the images according to scale
- Add a 100-pixel margin to the final image
- Save and close the final image
Both components have been enhanced through subsequent modifications by Prof. Dr. Enrique Jiménez and the other authors of this tutorial. For training purposes, Prof. Johannes Hackl has kindly provided three sets of tablet photographs, for which we extend our sincere thanks. These tablet photographs from the Frau Professor Hilprecht Collection are used throughout this guide and are available for download for practicing the tutorial.
Acknowledgements: These resources were developed over the course of a prolonged period of bulk digitisation at the British Museum, originally for the Ashurbanipal Library Project, then the Ur of the Chaldees project, before being adapted for the Babylon project. The concept is based on a Perl script written by Steve Tinney, which composited scans into CDLI “fat-cross” images. It was not possible to run those scripts using the set-up in place at the British Museum, so an equivalent was developed there that could be run through Photoshop, and would take into account the requirements of working with photos. Resizing and quality control scripts were written by Ana Tam. “Compositor” and “finaliser” scripts were written by Jonathan Taylor, drawing on pieces of code made available by Trevor Morris, the late Mike Hale, and Max Kielland.
Prerequisites
Before applying any action or script, some preliminary steps are required to ensure proper functioning.
Preparing Cuneiform Images
This tutorial assumes you have already photographed your cuneiform tablets following professional documentation standards. If you do not have images available you can use the ones provided for testing the workflow of this tutorial (see under Preparing Software and Code).
To use your own images, capture high-resolution photos of all tablet sides. Ensure the top side (photonumber_03) includes a scale (see next section). For optimal results, photograph against a high-contrast background, preferably black (Figure 2). Black velvet is highly recommended for this purpose, as it effectively eliminates reflections.
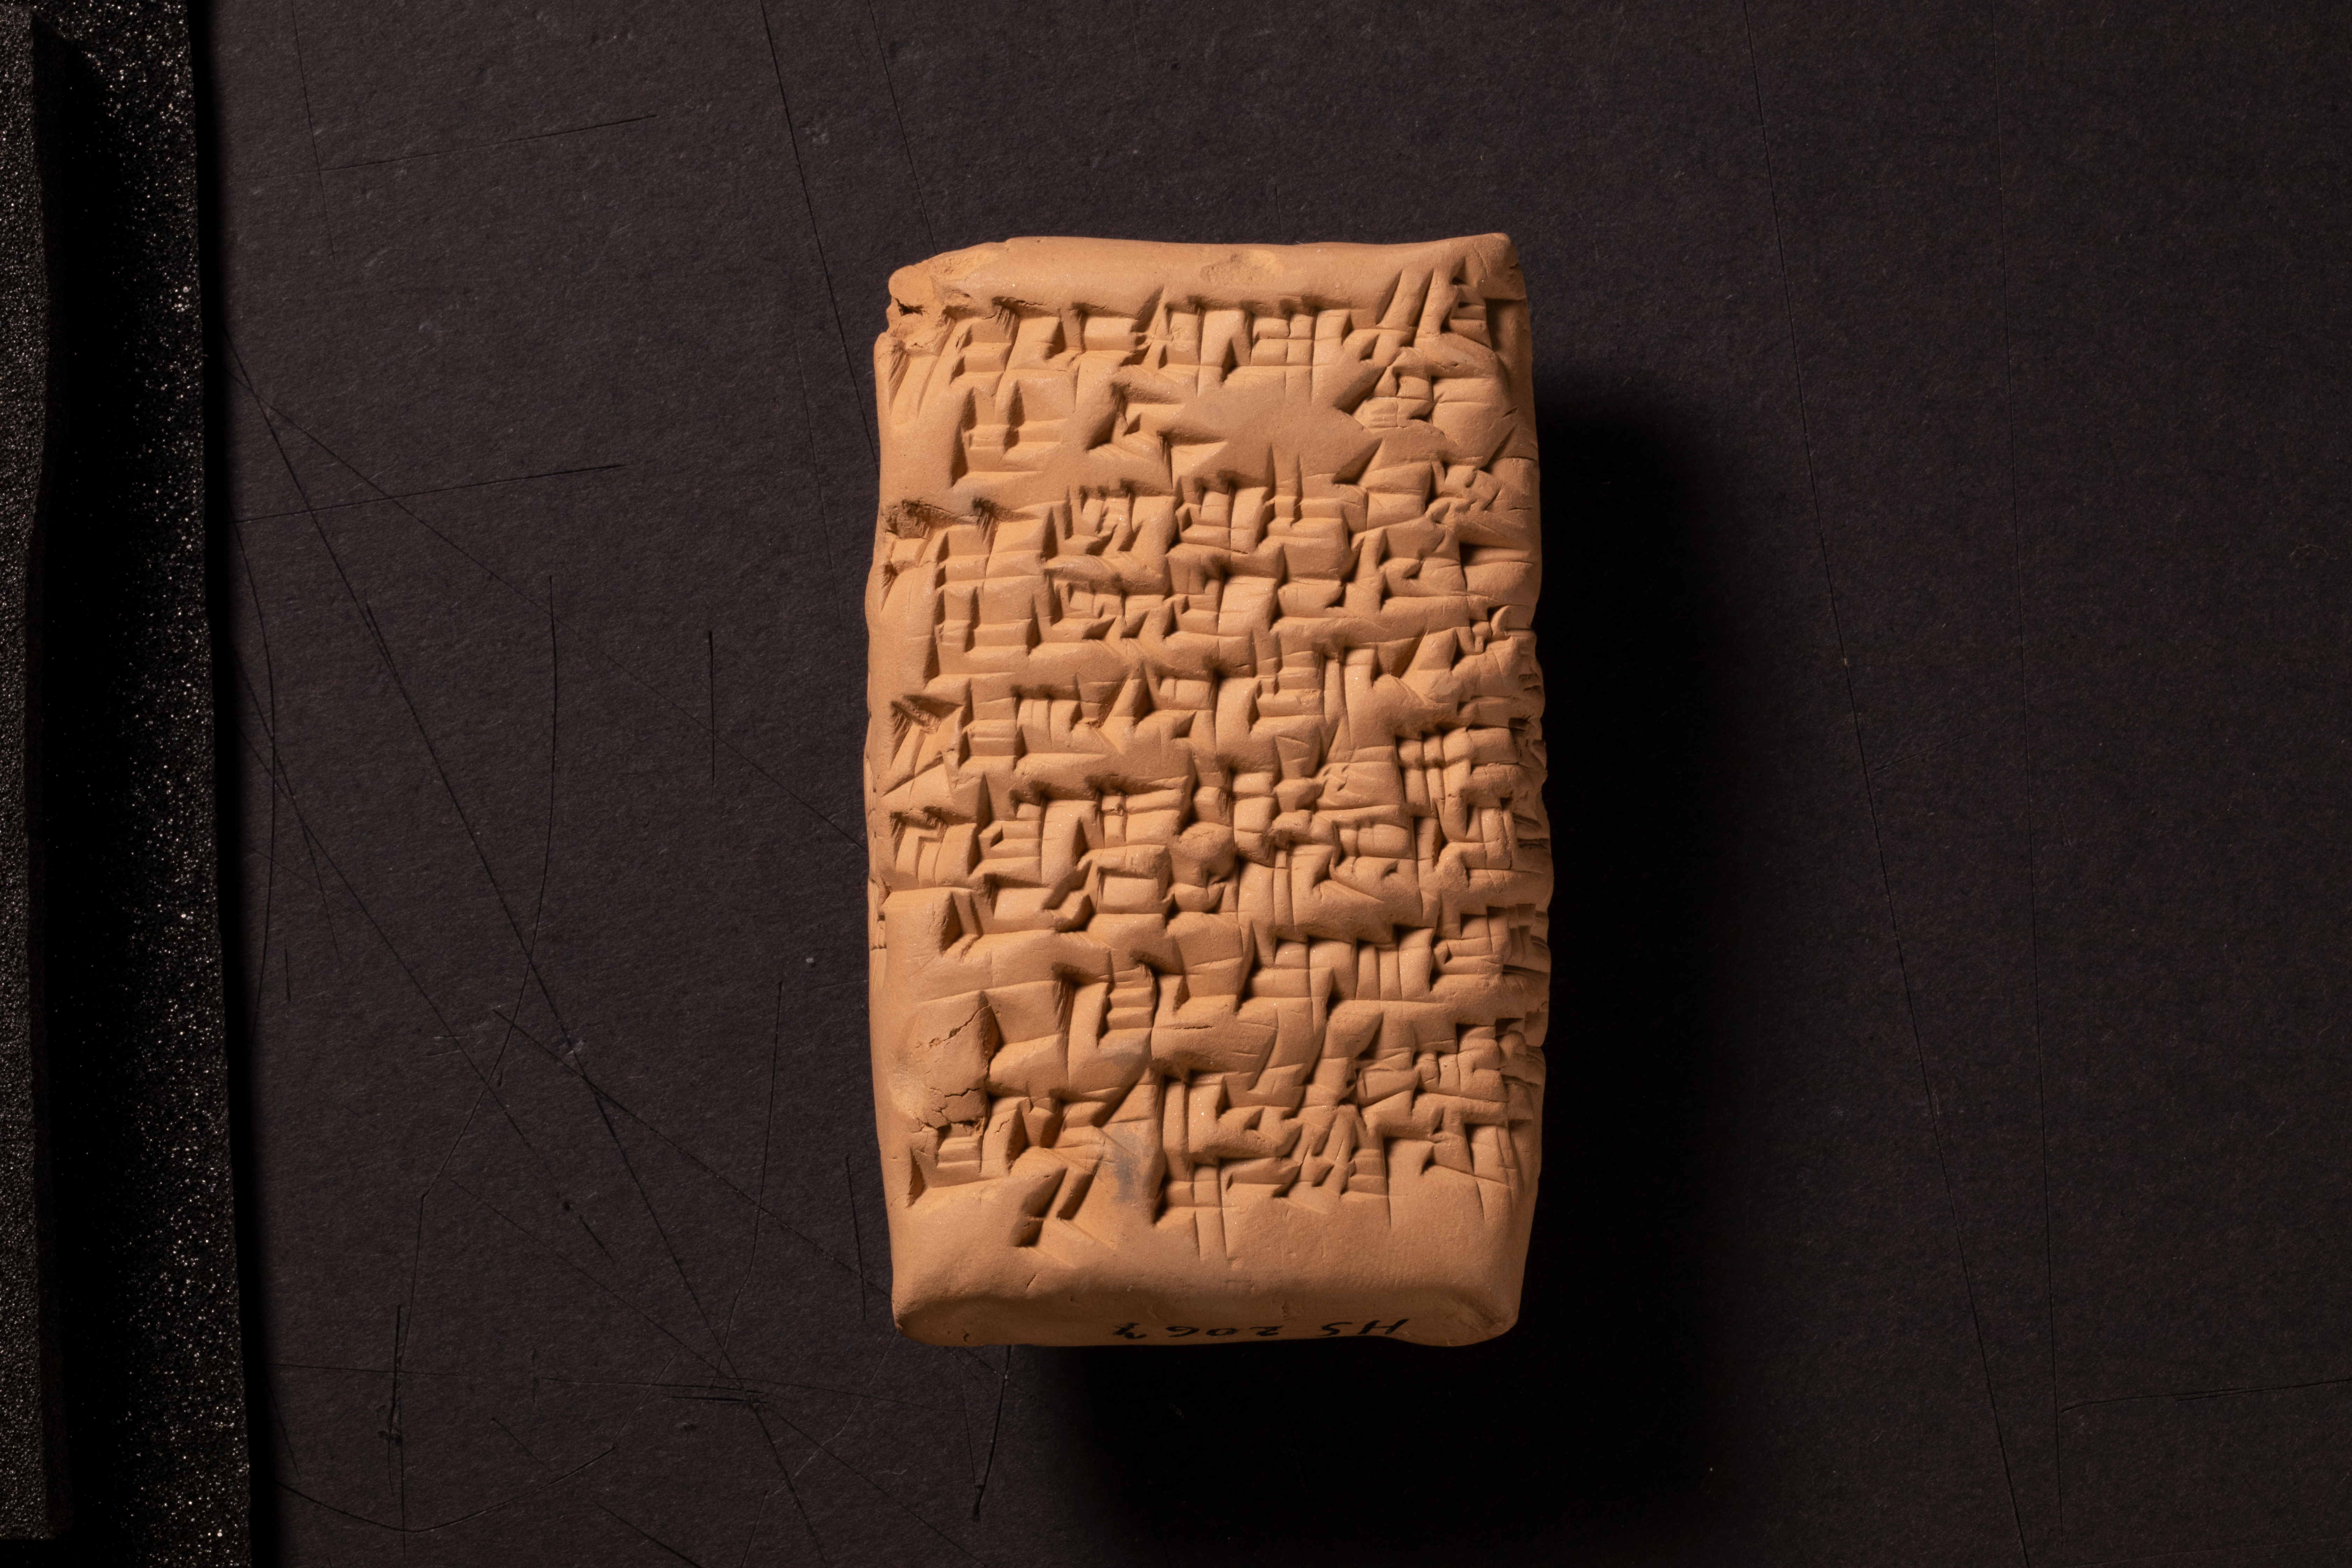
Figure 2: A photo of the obverse of HS.2067 (HS.2067_01) with a black background
The most important requirement for your photographs is consistency. Maintain the same camera configuration, lighting setup, and positioning for each tablet. This standardized approach ensures all tablet views will be uniform and scaled the same when assembled into the final rendering.
Labeling the photos with the tablets sides:
The ideal number of photos is 6, with each file capturing a specific view of the tablet. Using the obverse (front side) of the tablet as your reference point, the photos should be labeled as follows:
- TABLET-NUMBER_01 → obverse or front
- TABLET-NUMBER_02 → reverse or back
- TABLET-NUMBER_03 → top with scale
- TABLET-NUMBER_04 → bottom
- TABLET-NUMBER_05 → left edge
- TABLET-NUMBER_06 → right edge
Note on orientation: Don’t worry if you’re unsure which side is the obverse or reverse - even experienced Assyriologists sometimes can’t determine this at first glance. What’s important is to consistently label one side as the front (01) and the other as the back (02) throughout your documentation.
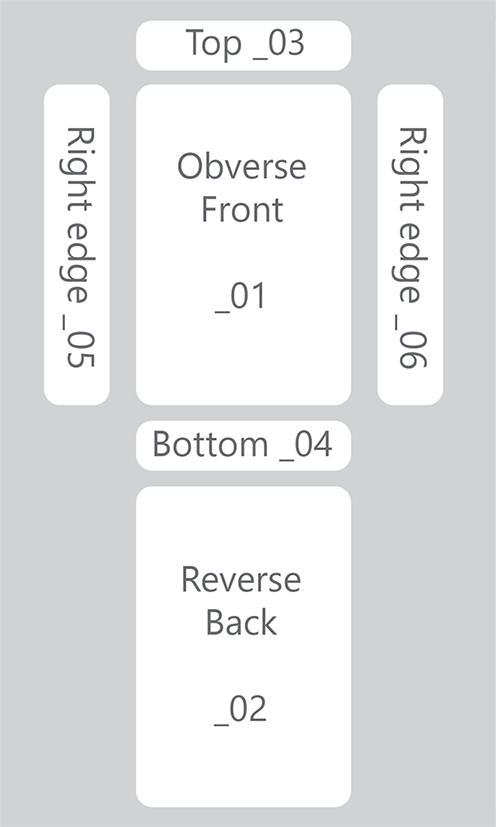
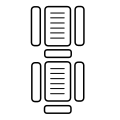
Figure 3: Labeling conventions for tablet views by side.
Try to maintain the consistent numbering of photos. In case you don’t have all six photos, the script will still work, but you must preserve the labeling convention (Tablet-number_XX) and content organization shown above. A critical requirement: ensure at least one blue square calibration reference is present, as the script uses it to rescale the final stitched image. This is included in both scale bars we provided for downloading.
For a set with only two photos (e.g., Tablet-number_01 and Tablet-number_02), place the scale reference in 02. If you have all photos but 03 is missing, create a placeholder Tablet-number_03 containing only the resized scale reference.
You can use Advanced Renamer to rename the files. This is a software tool designed for renaming multiple files and folders at once. It offers a variety of methods for generating new names and organizing data efficiently.
Make a copy of all photos on your local computer before starting. Never modify the original files!
File format and size:
The script primarily works with TIFF files, which are optimal for preserving image quality and metadata. While JPEG copies are often required for projects due to their smaller file sizes, making them better suited for web usage and sharing, the primary output remains in TIFF. The script can generate JPEG copies of the TIFF files when specified. If your project requirements don’t specify a format, you can always convert the stitched TIFF files to JPEG format as a separate step after the main processing.
Save your stitched images in either compressed or uncompressed TIFF format based on your project requirements. If no specification is given, save uncompressed - you can always compress files later in batch. See Compress *.TIFF to LZW or ZIP format for details.
You can set your final image resolution to either 600 or 300 DPI based on your project requirements. If no specification is given, use 600 DPI - you can always reduce resolution later in batch. See Reduce the DPI of Stitched Images for details.
Additional Images and Metadata
Institution Logo: The script allows you to add an institutional logo to the stitched image, similar to those used by the Hilprecht Collection.
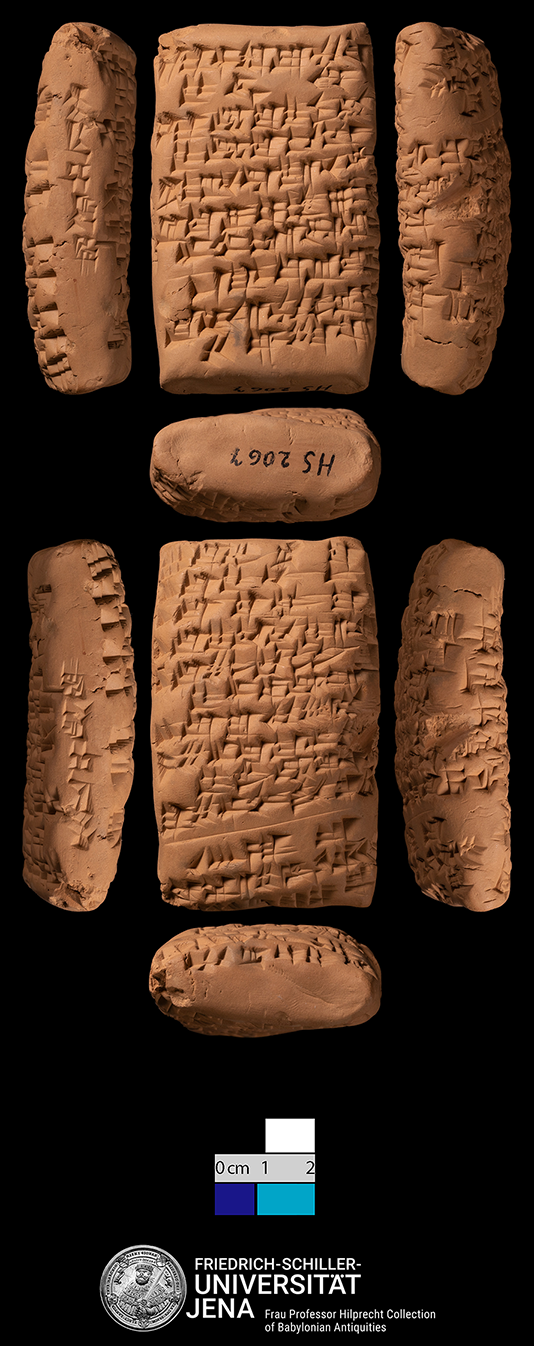
Figure 4: Stitched image of HS.2067 with the University of Jena logo
Your institution must provide a digital version of their logo. Use a fixed size for the logo, as dynamic scaling can produce unwanted effects. The script will only resize the logo if it exceeds the width of the stitched image, reducing it to 70% of its original size. For reference, use the 5cm scale shown in the HS.2067 image.
Alternatively, you can use a simpler approach by incorporating the logo into the scale bar, as demonstrated by the British Museum:

Figure 5: British Museum 5cm color scale with logo
Metadata:
Photoshop can embed basic metadata using its native standards and some IPTC fields, though not all. This script implements minimal metadata using both Photoshop’s standard and selected IPTC fields.
For more comprehensive IPTC metadata, we recommend using either Adobe Bridge or ExifTool for batch processing. Adobe Bridge is the preferred option, as ExifTool may encounter issues with special characters and lengthy text entries.
Preparing Software and Code
Install Adobe Photoshop on your computer. This workflow has been tested with Adobe Photoshop versions 2021 through 2025. Both the Photoshop Actions and JavaScript files are Photoshop-specific and are not compatible with other image editing software like GIMP.
Note: If the Actions don’t work as expected in your Photoshop version, please notify the tutorial authors or the OpenDANES team.
Download Files:
Download the required files from the eBL project’s GitHub repository.
Scripts and Actions:
cuneiform_documentation_bm.atnstitching_script_bm.jsxResize Scale 2cm.jsxResize Scale 5cm.jsx
Scales:
BM_5cm scale.tifBM_2cm scale.tif
The scale bars BM_5cm scale and BM_2cm_scale are essential components of this script, as they contain a blue square that serves as a reference for resizing the final image correctly.
For testing this workflow, we provide example sets:
- HS.1671: 6 photos for stitching with 5cm scale bar
- HS.2067: 6 photos for stitching with 2cm scale bar bar
- HS.1662: 2 photos for stitching
mock_logo_tutorial: Institutional logo sample
Load the Actions
To load actions in Photoshop:
- Open the Action panel:
- Navigate to
Photoshop > Windows > Actionsor - Use the shortcut
Alt+F9
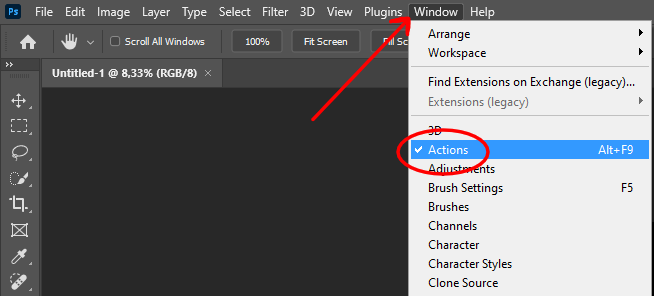
Figure 6: Activation of the Actions Panel.
- Navigate to
- Import the custom actions:
- Click the Actions panel menu
- Select
Load Actions...
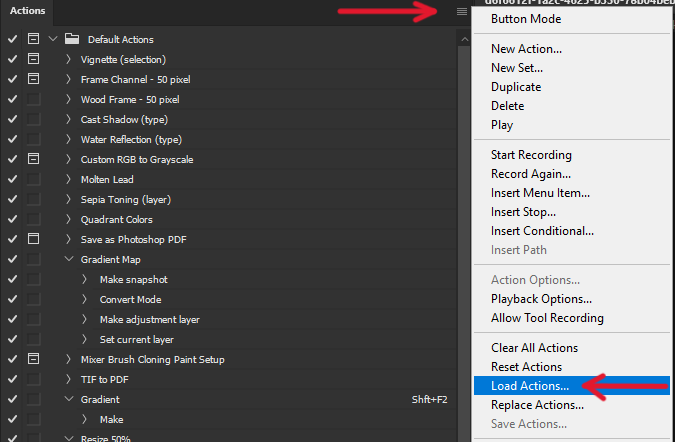
Figure 7: Load operation for the custom action Babylon_Project_modified.atn.
- Select and load the file:
- Locate
Babylon_Project_modified.atn - Click
Load
- Locate
The actions will now appear in your Actions panel under the Babylon Project folder.
You can modify these actions or create your own as needed. With the actions loaded, we can proceed to pre-processing.
Pre-Processing
Converting Camera Files to TIFF Format
If your photos are in any of these camera formats:
- RAW formats (*.CR2, *.NEF, *.ARW, etc.)
- Digital Negative (*.DNG)
- Camera-specific formats (*.RW2, *.ORF, *.PEF)
Follow these steps to convert them to TIFF:
Note: If your photos are already in TIFF format, you can skip the conversion process. Simply create the
_PreProcessfolder and place your TIFF files directly there.
- File Organization:
- Create a folder named
_ToProcess - Create another folder named
_PreProcess - Copy all your camera files into the
_ToProcessfolder
- Create a folder named
- Using Adobe Photoshop:
- Open Photoshop
-
Navigate to
File > Scripts > Image Processor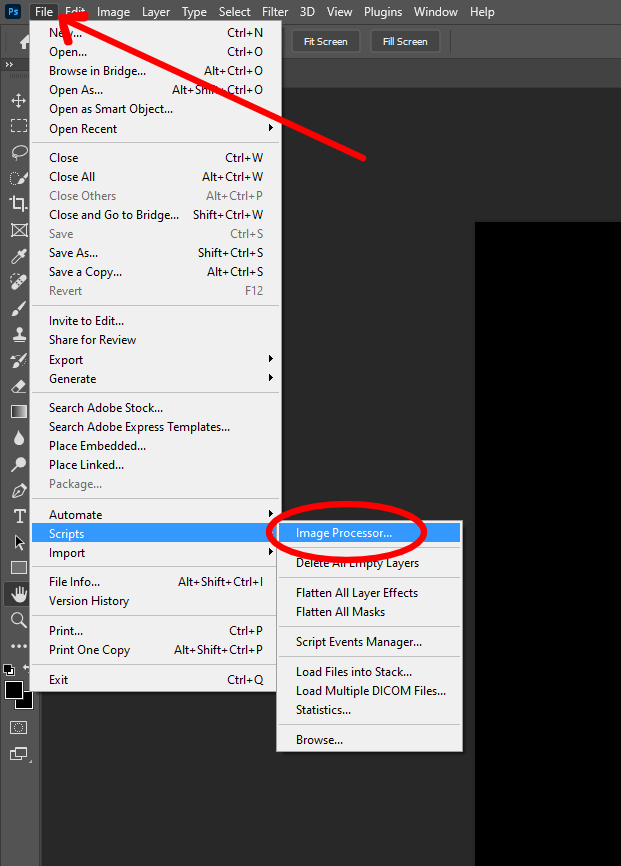
Figure 8: Activation of the image processor dialog box.
- In the Image Processor dialog box:
- Set the source folder to
_ToProcess - Set the destination folder to
_PreProcess - Check the “Save as TIFF” option
- Click “Run” to begin the conversion
- Set the source folder to
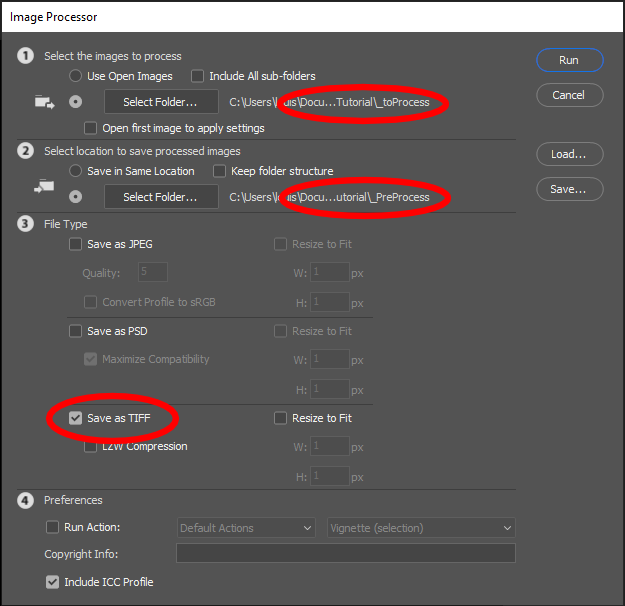
Figure 9: Selection of TIFF conversion parameters.
Rotating Photos
After converting to TIFF format, ensure all photos are oriented correctly for reading the cuneiform text. The correct orientation should match how you would naturally read the cuneiform text on the tablet. If multiple photos need the same rotation:
In Windows File Explorer:
- Navigate to the
_PreProcessfolder - Select all photos (Press Ctrl + A)
- Right-click to open the context menu
- Choose either
Rotate rightorRotate leftas needed
Separation of Photos with Suffix _03
For photos showing the scale (those with suffix _03), we need a separate workflow since they require digital scale placement. Follow these steps:
File Organization:
- Navigate to the
_PreProcessfolder - Create a new folder named
PreProcess_03 - Locate all photos with the suffix
_03 - Move these
_03photos to thePreProcess_03folder
This separation ensures that scale-containing photos will undergo different processing steps from the rest of the photos.
Once you have:
- Prepared and labeled the images correctly according to tablet’s sides
- Converted your camera files to TIFF format
- Downloaded and loaded in Photoshop the necessary actions
- Rotated the images if needed
- Separated the images with suffix _03
You’re ready to proceed with extracting the tablet images from their backgrounds using Photoshop Actions.
You can process multiple tablets simultaneously. The code will combine tablets photos according to their file names.
Processing Photos without Scale
- Create a folder named
_Processed - Open Photoshop
-
Navigate
File > Automate > batch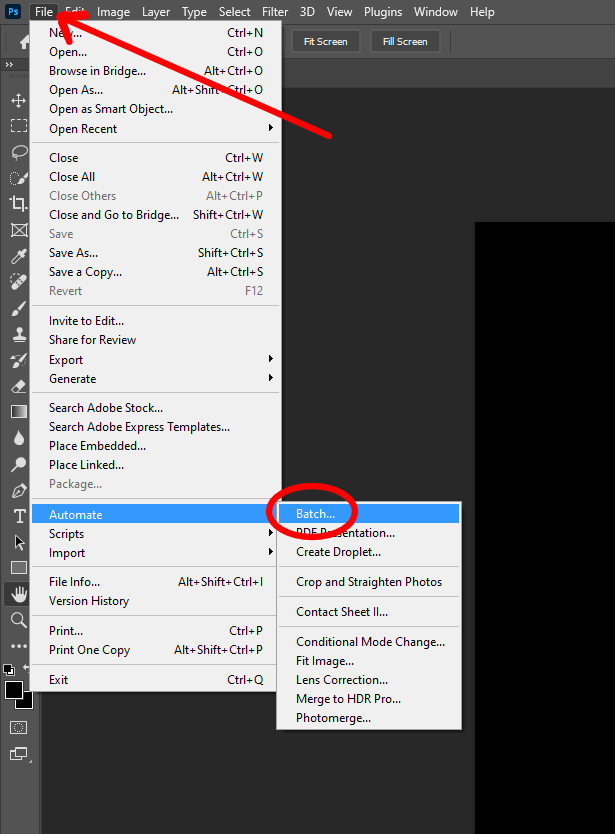
Figure 10: Batch Dialog Box Operation
- Under
Playin the Action menu, check the options underSetuntil you find the name of your project (Cuneiform Documentationor another name assigned by you such asBabylon Project). Then selectViews 1-6 BATCHunderAction. -
Set the source folder to
_PreProcess.Note: If you converted the images to TIFFs make sure your source folder is set to the folder with the actual images in it, not just a parent folder or check
include all subfolders. - Set
_Processedas the final destination.
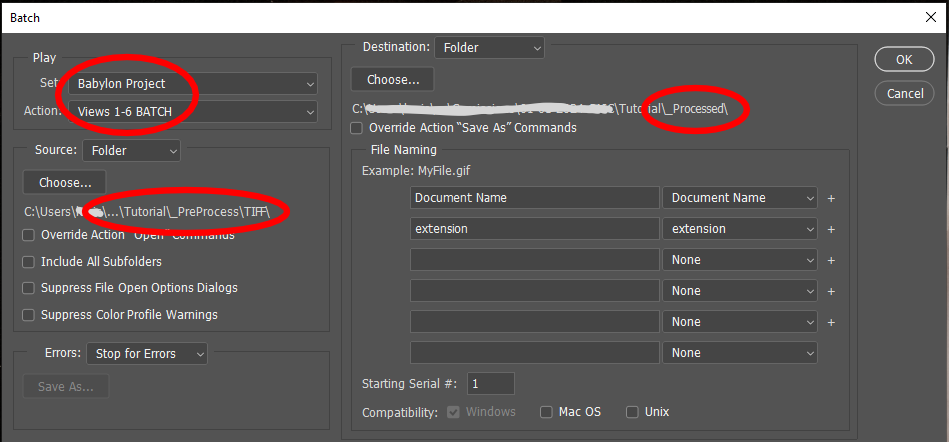
Figure 11: Action Application Options for 'Views 1-6 BATCH'
Important: The action uses the secondary color as the background, so ensure it is set to black. To change the secondary color to black, click on the background and secondary color icon.
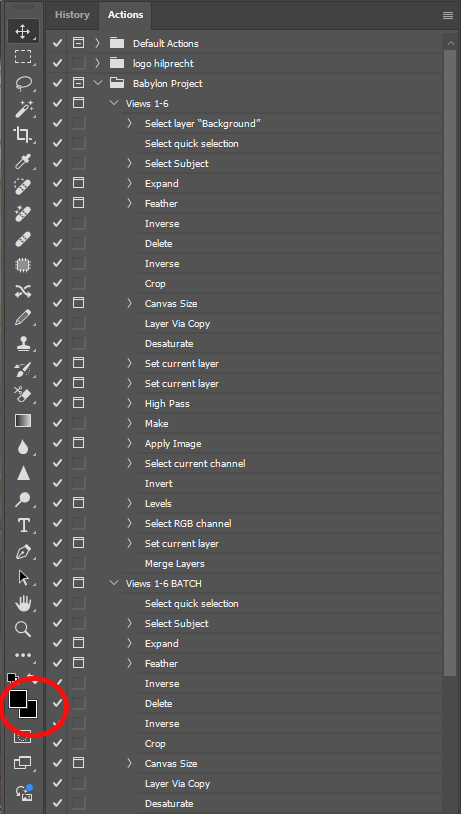
Figure 12: Background Color Selection in Color Picker
Disable all action toggles to prevent Photoshop from requesting approval before applying each action.
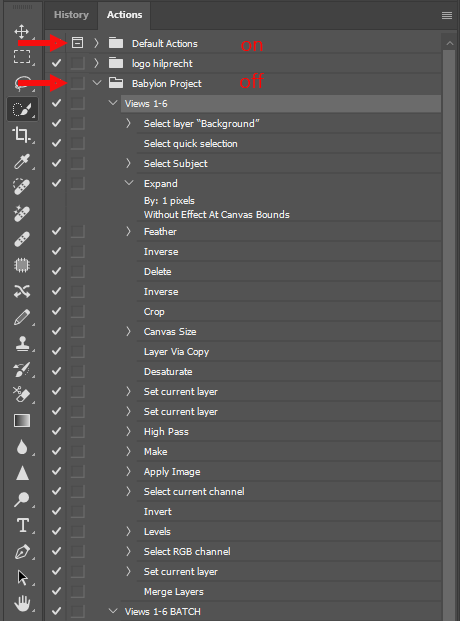
Figure 13: Action Toggle Deactivation
Photoshop will then use the Object Selection Tool to automatically separate the tablet images from their background and apply various digital enhancements before saving and closing them. The final output should look like this:
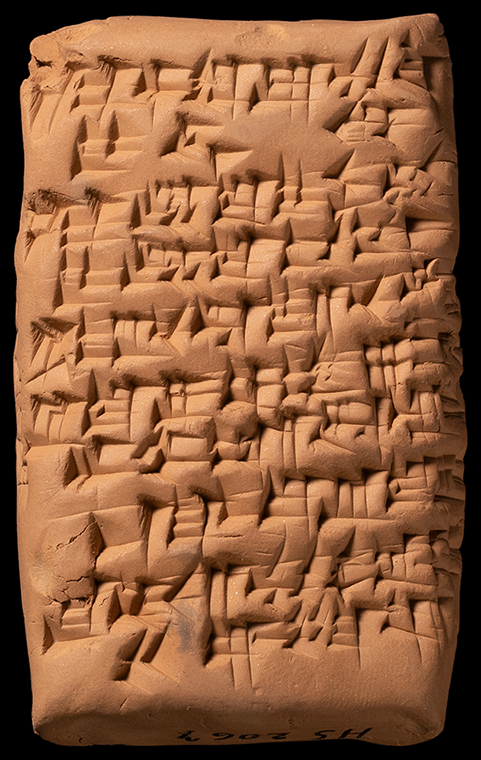
Figure 14: Result of '1-6 View BATCH' Action applied to HS_2067_01
The batch process may need to be run multiple times, as some photos might not be processed correctly on the first attempt. In most cases, running the process two or three times will successfully process all remaining images. If any photos remain incorrectly processed, please refer to the troubleshooting section.
Note: For faster access, you can assign a Function Key (such as F6) to the
Views 1-6 Batchaction. Simply select the action, click the menu icon, select Action Options, and assign your preferred function key.
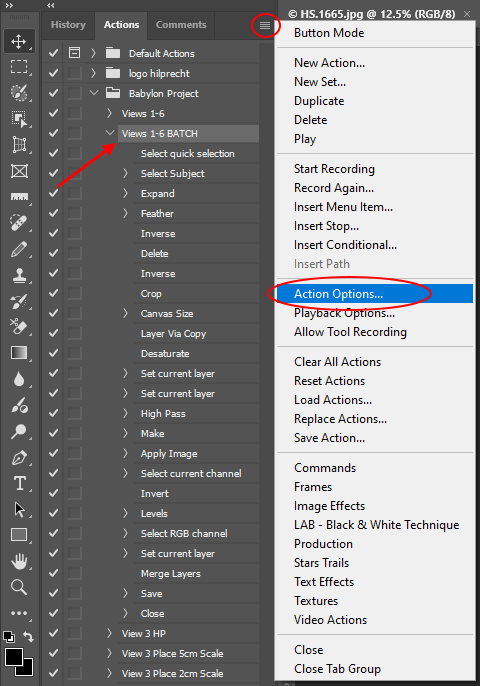
Figure 15: 'Views 1-6 BATCH' Action Configuration.
Processing Photos with Scale
This section covers the processing of photos with the prefix _03. It will involving adding the scale bars and resizing them to accurately represent the tablet size.
Note: This step includes a manual adjustment that cannot be automated. However, after performing this manually once you can then perform the process automatically (see Automatic Application of the Action). You can also create a
Save and Closeaction to streamline the process slightly.
- Navigate to
File > Automate > Batch - Select
View 3 HPfrom the Action dropdown menu - Set the source folder to your
_03photo directory (e.g.,PreProcess_03).
The process creates two layers for each photo: HP and background, which are essential for subsequent operations.
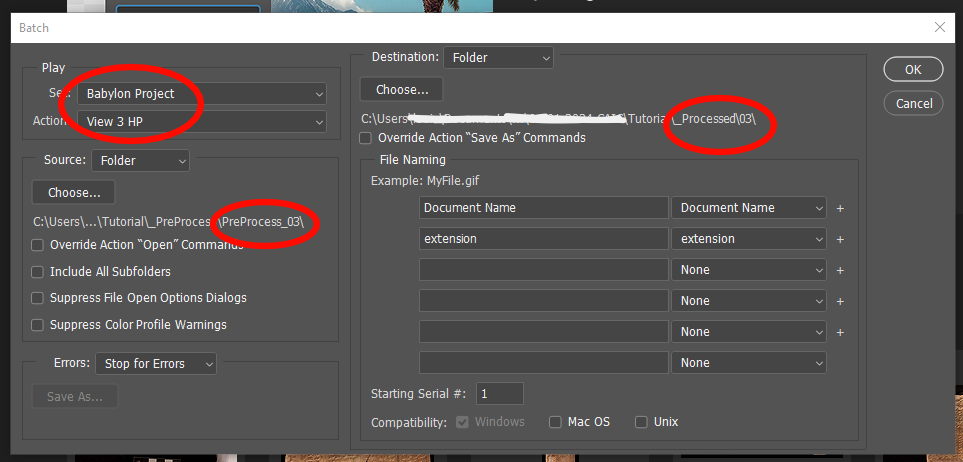
Figure 16: 'View 3 HP' Action Configuration.
Adding and Resizing the Scale Bar
- Open each photo with the
_03suffix -
Select the
Line Tool(pressUon your keyboard)The
Line Toolis under theShape Toolin the left-side toolbar. If you pressU, make sure the shape is set onLineand not something else. You can right-click on theShape Toolto change the shape type.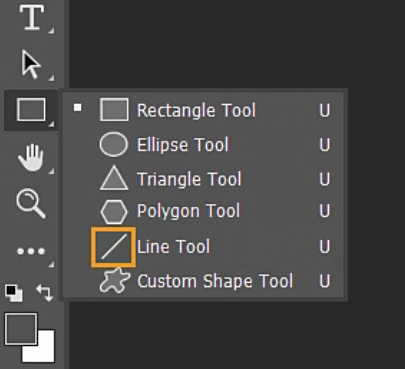
-
Using the scale visible in the photo, draw a line exactly 1 cm long
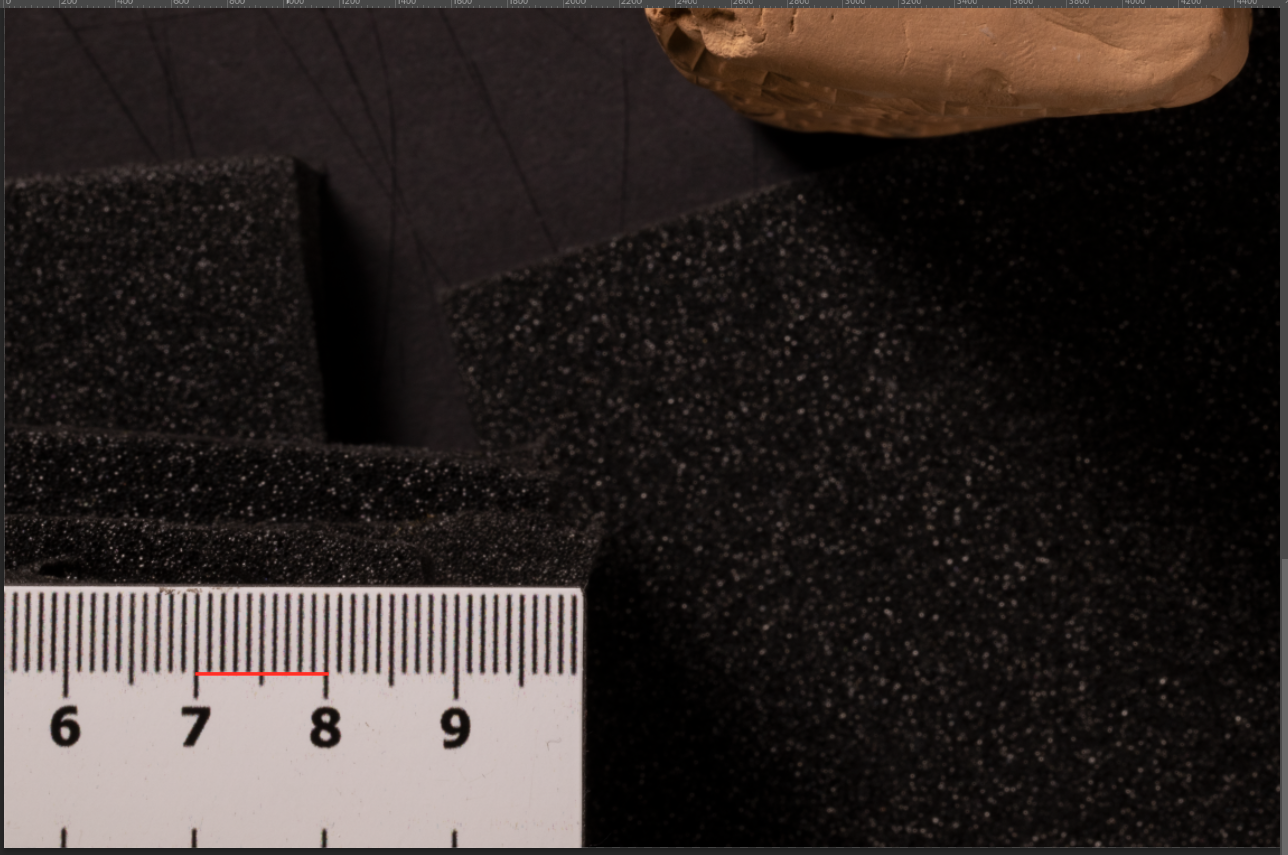
Figure 17: Line drawn to 1 cm length for scale bar calibration.
- Check that a new layer named
Line 1is created in the Layers panel. If the layer has a different name (this may occur in non-English versions of Photoshop), rename it toLine 1or change the required Javascript to process another name:- Open
Resize Scale 5cm.jsxin any text editor, like notepad. - Find this line (around line 6)
var layer = activeDocument.layers.getByName("Line 1"); //Grab the currently selected layer - and change
"Line 1"for the name generated in your local version of photoshop. - Save and close.
- Do the same with
Resize Scale 2cm.jsx
- Open
- Repeat steps 2-4 for all remaining images
- Save your work
Manual Set-up of JavaScript Sources
- With the
_03image file open, locate and selectView 3 Place 5cm Scalein the Actions window -
Select the
Placeaction within this group and start Recording
Figure 18: Start Recording of Scale Addition Action
- Import the
BM_5cm_scale.TIFfile into your Photoshop workspace as another layer of the_03photo using either:- File import
- Drag and drop from your source folder (make sure to drop the
BM_5cm_scale.TIFon the image so it is added as a layer and not as its own image). After dropping, press enter.
-
End the recording
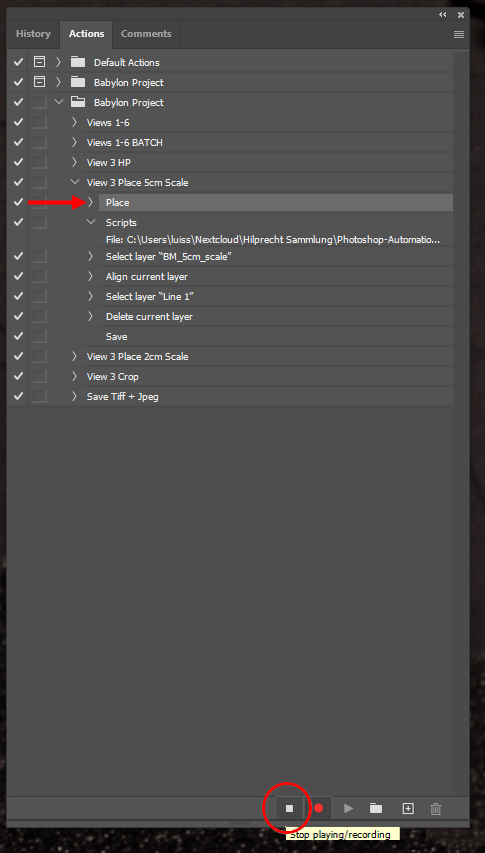
Figure 19: Recording Termination of Scale Addition Action
- Delete the original
Placeaction (select it and press the bin at the bottom right of the Actions window)
Now, you can rescale BM_5cm_scale.TIF to match the cuneiform tablet:
- Initiate the action recording, like in Figure 18.
- Navigate to
File > Scripts > Browse - Locate and select
Resize Scale 5cm.jsx(the action will probably fail but that is ok). This should rescale theBM_5cm_scale.TIFlayer. - End the recording.
Note: The action may fail at this point - this is expected behavior.
After completing the process for the 5cm scale, go back to the beginning of this section and repeat the instructions for the 2cm scale. You should see View 3 Place 2cm Scale in the actions window below the View 3 Place 5cm Scale.
Then, for each _03 image you should only keep one scale bar (the 2cm or 5cm).
Choose a scale bar that fits within the tablet’s width. The JavaScript measures the image width, not the tablet width. If the scale bar is wider than the tablet, it will cause distortion in the final image, making that side appear disproportionately small.
Position the scale bar approximately 0.5cm below the tablet’s bottom edge.
Automatic Application of the Action
After completing the manual action above once, you have two options for applying the action and adding the scale bar to all other _03 images:
- Individual Processing
- Open each
_03image separately - Apply the appropriate action based on scale size (2cm or 5cm)
- Open each
- Batch Processing
- Sort your
_03images into two separate folders:- One folder for tablets using 2cm scale
- One folder for tablets using 5cm scale
- Navigate to
File > Automate > batch - Select the appropriate action
View 3 Place 5cm ScaleorView 3 Place 2cm scale.
- After running the action, each image window will remain open with the resized scale bar. Like before, position the scale bar approximately 0.5cm below the tablet’s bottom edge
- Sort your
Final Processing
Remove the background removal from your _03 photos:
- Navigate to
File > Automate > batch - Select
View 3 Cropin the the Action dropdown menu. - Set your source folder to the directory containing your
_03photos
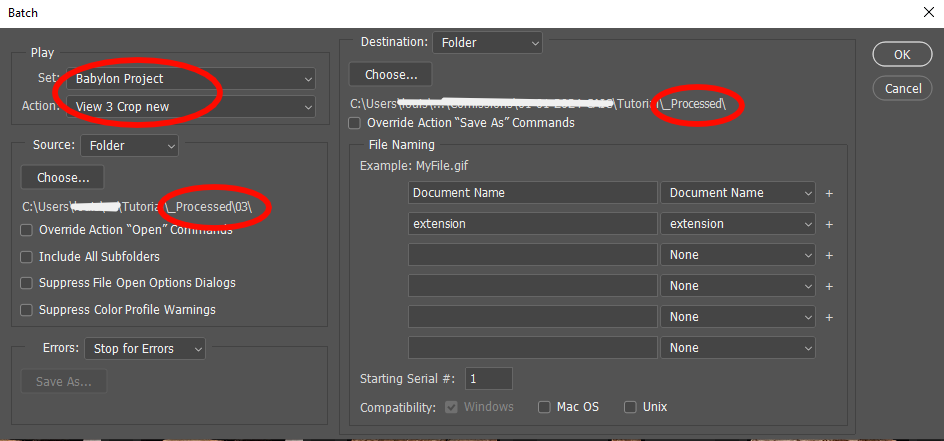
Figure 20: Settings for removing the background
This action will:
- Remove the original background
- Create a new black background
- Merge all layers into one
- Save and close the file automatically
File Consolidation:
Transfer all processed _03 photos to the _PreProcess directory containing your other photo files. Individual subfolder organization is not required, as the script automatically groups photos with matching filenames. This consolidation step ensures all related photos are in place for the automated stitching process.
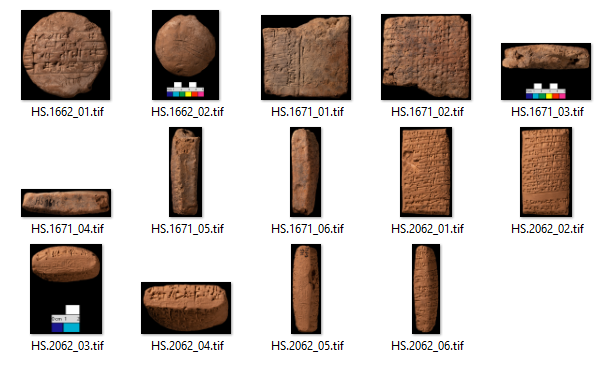
Figure 21: All views of the tablet ready to be stitched
Running the Stitching Script
Once all photos are processed as described earlier:
- Open
Photoshop - Navigate to
File > Script > Browse - Locate and select
stitching_script_bm.jsx.
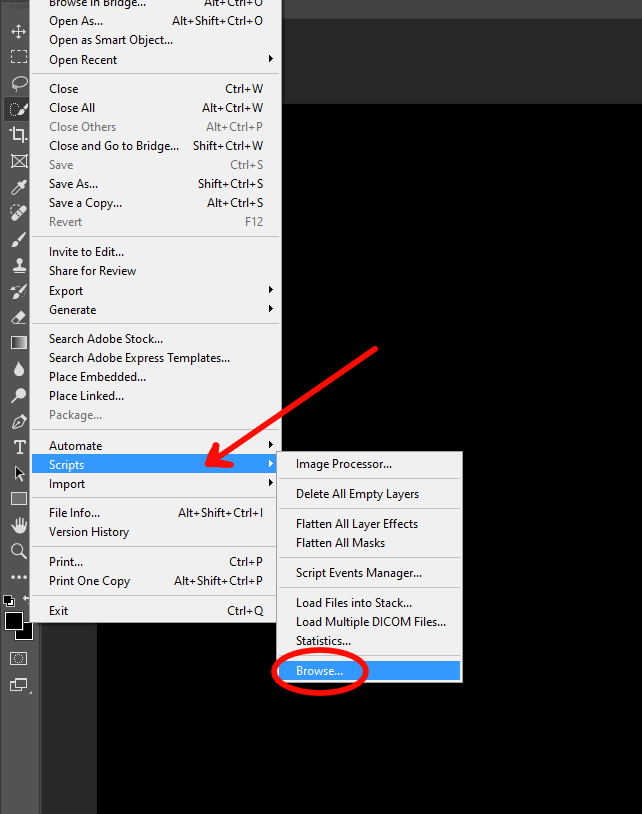
Figure 22: Navigation to the script stitching_script_bm.jsx
The script interface has two tabs, Processing Options and Metadata:
Processing Options:
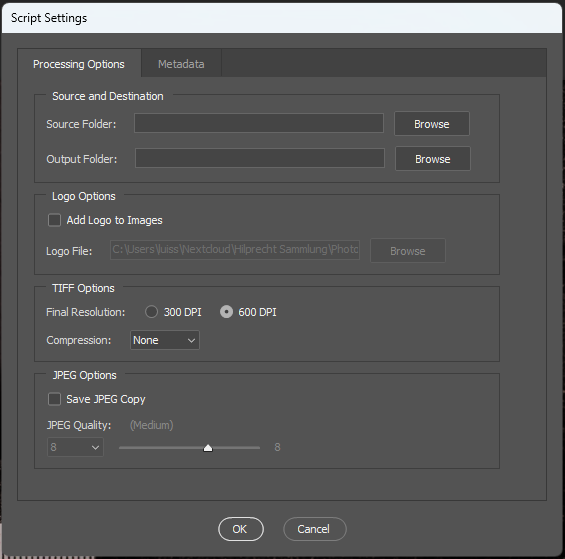
Figure 23: User interface tab Processing Option.
- Source folder: select
_PreProcess - Destination folder: Create and select a folder like
_Processedorfinished.
Never place the destination folder inside the source folder - this will cause a script error as it will attempt to process the new folder
- Logo inclusion toggle
- Final resolution settings
- Compression type (if needed)
- JPEG copy creation (optional). For JPG files, a compression setting of 8 provides the optimal balance between quality and file size.
Metadata:
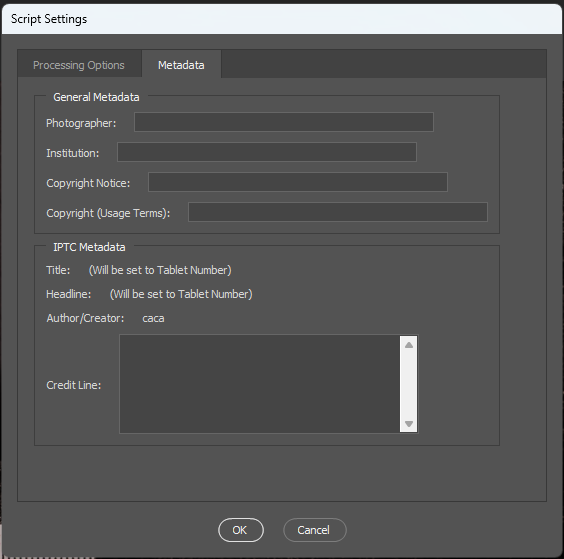
Figure 24: User interface tab Metadata.
- General Metadata section:
- Fill in all fields as needed
- IPTC Metadata section:
- Only modify the Credit Line field
- Other fields auto-populate from General Metadata and tablet information
Note: Your settings will be saved for future use, requiring changes only when necessary.
Running the Script:
- Click
OKto start processing. - The script will
- Sort through your folder
- Classify photos by filename
- Create individual folders for each set
Note: For maximum efficiency, preprocess as many photos as possible before running the script.
The stitching_script_bm.jsx performs these operations:
- Creates black background and places all images
- Arranges images based on filenames
- Mirrors images with
_05and_06suffixes for reverse side alignment - Embeds metadata including:
- Photographer name
- Credit lines
- Title
- Optional institutional logo placement
- Compression options:
- LZW or ZIP compression
- Optional JPEG export
Post-Processing
After running the script:
- Review all assembled photos
- Identify any incorrect assemblies
- For persistent issues, process problematic images manually (see troubleshooting).
Convert from *TIFF to *.JPEG
If required for your project you can convert the \*.TIFF files to \*.JPEG using Photoshop’s Image Processor:
- Open
Photoshop -
Navigate to
File > Scripts > Image Processor.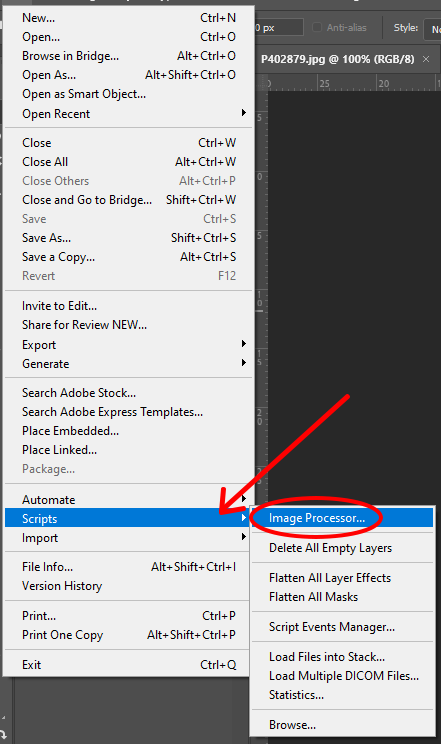
Figure 25: Navigation to Image Processor.
This will open the Image Processor user interface. Specify the settings for converting your files.
-
Enable
Save as JPEGas the file type.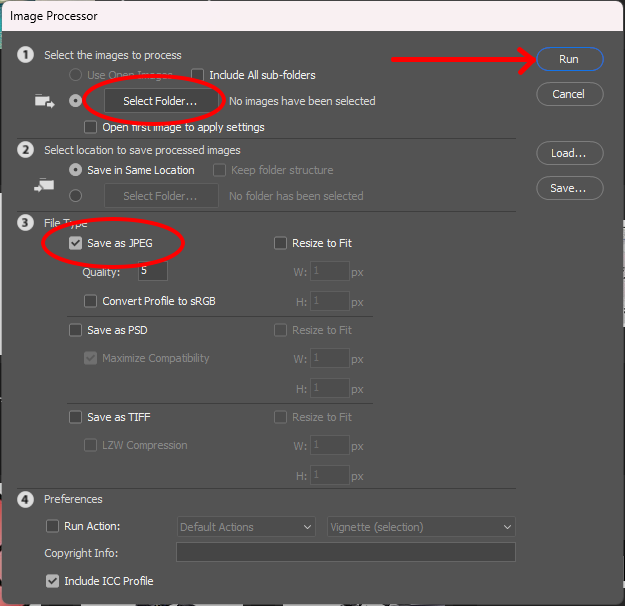
Figure 26: Settings for saving as JPEG.
- Set your desired quality
- Select destination folder
Compress *.TIFF to LZW or ZIP format
Depending on the specifications of your project you can compress the *.TIFF file to LZW or ZIP format:
- Open
Photoshop - Navigate to
File > Scripts > Image Processor - Select source folder containing TIFF files
- Choose destination folder
- Enable “Save as TIFF”
- Check LZW compression.
If you need ZIP compression. You can use Actions and Batch Processing:
- Record a new action
- Open a TIFF file
- Save it as TIFF with your desired compression
- Stop recording
- Go to
File > Automate > Batch - Select your action and source folder
Reduce the DPI of Stitched Images
In Photoshop:
- Navigate to
File > Scripts > Image Processor - Select your source images
- Choose destination folder
- Select output format
- “Save as TIFF” or
- Your preferred format or
- Both formats
- Enable “Resize to Fit”
- For 300DPI resolution, enter:
- Width: 1500 px
- Height: 2000 px
- Click
Runto process images
Troubleshooting
Removing the Background Manually
In some cases, the action Views 1-6 BATCH might not perform the background removal as expected, particularly if there is insufficient contrast between the tablet and the background. If this happens, you will need to manually cut out the tablet. Follow these steps:
- Open each photo individually.
- Select the tablet within the photo using the
Object Selection Tool(W). - Apply the
Views 1-6action.
This action performs the same background removal process as Views 1-6 BATCH, but starts with a predetermined selection, which can be useful when the automatic selection fails.
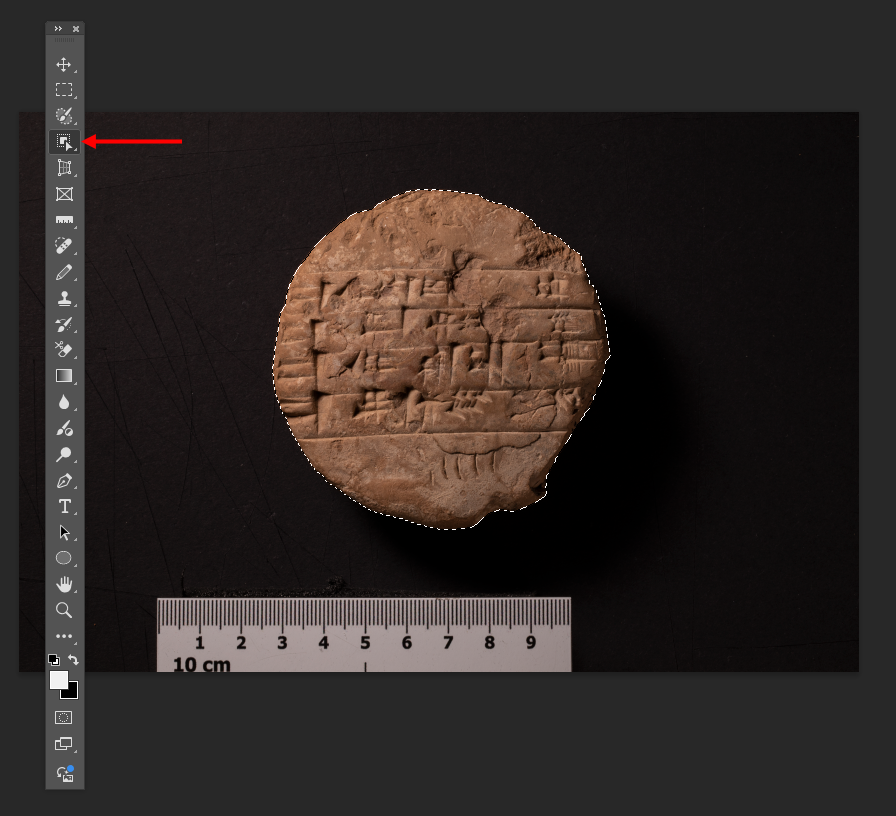
Figure 27: Location of the Obejct Selection Tool.
Stitching Photos Manually
If the stitching script does not work as expected, you can manually stitch the photos using Photoshop:
- Create new file
- Open
Photoshop - Create a new file with dimensions 8000 x 8000 px
- Set resolution to 600 dpi.
- Open
- Import and arrange photos
- Open all source photos
- Copy and paste each photo into the new file, one at a time.
- Arrange the photos in the correct order, ensuring they align properly.
Important: Adjust the size of the photos according to the dimensions in photo _03 (the one with the scale). Do not alter the photo with scale!
- Process reverse edges
- Copy and paste the left and right edges
- Rotate them 180 degrees
- Place adjacent to corresponding reverse sides
- Final processing
- Select the entire composition with the
Object Selection Tool(or W) - Ensure that the entire tablet and scale are included in the selection.
- Crop:
Image > Crop - Merge layers:
Layer > Merge visibleor pressCtrl + Shift + E - Save and close the file
- Select the entire composition with the
Final Remarks
We trust this tutorial has helped you to establish an efficient workflow for creating standardized tablet documentation. While the scripts and actions automate most tasks, manual intervention options ensure you can handle any technical challenges that may arise. For updates, bug reports, or additional assistance, please contact the tutorial authors or the openDANES team.