How to Annotate Cuneiform Texts
Lesson Overview
This tutorial presents a high level overview of how to annotate a cuneiform text for linguistic content. In general, linguistic annotation is an important first step if one wants to make a written language corpus amenable to more sophisticated linguistic analysis than just key word searches. It is also usually necessary to annotate the corpus if one wants to train a language model on it which can parse new sentences according to the language’s grammar. Exactly what we mean by ‘annotation’, and other reasons why one might want to make annotations of a corpus, will be discussed the Purpose of Annotating. The tutorial will then go through an illustrative example to show the important aspects of annotation.
This tutorial uses examples from Akkadian, but the general techniques can adapted to other ancient language corpora.
Basic facts about cuneiform
Cuneiform is a writing system developed in southern Mesopotamia towards the end of the fourth millennium BCE. It uses logograms, syllabograms and determinatives. Cuneiform was used to express several languages of the ancient Middle East, including Sumerian, Akkadian, Hittite, Elamite, and Hurrian. The most common way to represent cuneiform signs in modern publications is via transliteration. When a sign is transcribed using capital letters, it indicates a logogram. When lower case letters are used, it indicates how the sign is to be pronounced in a syllabic reading. If we write a sign within half-square brackets (‘⸢KUR⸣’), it is only partially visible on the tablet, while if it is written within square brackets (‘[KUR]’) it means the sign is no longer visible at all, and is reconstructed by assyriologists. When we write a sign as a superscript (for print editions) or within curly brackets (for online editions), it means the sign serves as a determinative.
For example, the sign transcribed as KUR looks like three triangle wedges arranged in the shape of a mountain. When written logographically, it usually stands as the word for ‘mountain’ or ‘land’. But this sign can be pronounced in different ways depending on context. It can be read ‘mat’, ‘kur’, ‘nat’, and ‘šad’, among other things. When we write {KUR} (in digital editions) or KUR (in print editions), it means that the KUR sign functions as a determinative signaling that the word following it is a type of land or mountainous area.
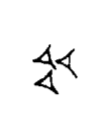
Drawing of the KUR sign.
We usually use dashes between transliterated signs to indicate they belong to the same word. Thus the sequence a-me-el šar-ri represents two words, and in Akkadian it means ‘man of the king’.
Normalization takes transliteration and expresses the actual phonological forms behind it. It dispenses with dashes and uses macrons and circumflexes to indicate vowel length. Using the above example, the normalization of a-me-el šar-ri would be amēl šarri. The macron sign above the vowel ‘e’ indicates this vowel is long.
The Purpose of Annotating
Linguistic annotation allows a human editor to add information to a text relating to its linguistic structure, whether that deals with semantics, morphology, syntax, or phonology. Providing such linguistic information about a text via annotation has a number of uses, such as:
-
Providing linguistic data for machine learning algorithms seeking to model properties of the underlying language;
-
Illustrating for students of the language how to grammatically analyze a text, or as a check against the students’ own analyses;
-
Providing empirical data to a researcher who wants to ask questions involving the systematic recording of all the linguistic data in a large number of texts, or questions involving linguistic patterns that emerge only upon processing the data by a machine;
-
Giving the annotator themselves an opportunity to work through a corpus in detail, creating an index, much like an editor does when preparing a new print edition of a text.
The Stages of Annotating
When linguistically annotating a cuneiform text it is convenient to divide the work into a preprocessing stage and an actual annotation stage. We will discuss each of these stages in order.
Preprocessing the Raw Text
Annotating a cuneiform text generally requires that it first be available in transliteration or transcription/normalization (depending on the specific purposes of the annotator). If a cuneiform text has been edited in a print journal or other scholarly publication, it will be represented in transliteration. Increasingly, transliterations of cuneiform texts are also available online as part of digital databases. Sometimes the database simply displays the text to you in your browser (i.e. as part of an HTML file) and you will have to scrape the transliteration from the site using a variety of data processing tools. But often times the database also allows you to download the transliteration in a text file. In fact, you should check if the database has their entire collection of transliterations available for download (see OpenDANES resources for downloadable datasets), as annotation is usually a process applied to an entire group of texts rather than just one. One repository that does this is the CDLI.
Some online cuneiform corpora, such as those found in Oracc, also include normalized versions of cuneiform texts which can be obtained through suitable preprocessing. Readers interested in learning how to download large sets of normalized texts from Oracc can use the Jupyter notebooks of Niek Veldhuis, which come with substantial documentation. This notebook in particular will allow you to obtain normalized versions of texts from one of the State Archives of Assyria volumes online.
In what follows we will use portions of a normalized text obtained from Oracc via the above notebooks for illustrating preprocessing and annotation. This text is SAA 5, 114, an Akkadian letter from the royal archives of Sargon II (r. 721-705 BCE).
The basic file format of the normalized text you want to ultimately annotate should be a plain text file, with no HTML markup or other metadata. In particular, there should be no punctuation markers like periods or quotation marks. You need to make sure that each word in the text is separated by spaces (ideally one) from the preceding and following words, which allows the annotation program to split up the text file into word-size units. This important preliminary step is called tokenization, and the broken-up items in the text are called tokens. Note that depending on your purposes, you may choose to reduce or eliminate symbols in the text denoting unreadable signs (e.g. the symbol ‘x’) or other comments indicating layout of the text and tablet (such as ‘rest of tablet broken’). Generally, removing broken or uninterpretable symbols makes little difference for training morphosyntactic language models. But if you wish to have your annotations retain more fidelity to the original text (e.g. by indicating how far apart fragments of linguistically parsable material are from each other), it is better to retain these tokens.
In our case (SAA 5, 114), our desired plain text file looks like
ana šarri bēlīya urdaka Gabbu-ana-Aššur Urarṭaya emūqēšu ina Wazana uptahhir o bēt pānīšūni lā ašme Melarṭua māršu Abaliuqunu pāhutu ša {KUR}x x+x-pa adi emūqēšunu x x+x x x x x x x x x mātāti izaqqupu šarru bēlī lū ūda šarru bēlī lū lā iqabbi mā kî tašmûni mā atâ lā tašpura
Note that in contrast to the online edition of this text, there are no special marks and comments describing line numbers, breakage in the tablet, obverse and reverse, or reconstructed parts of the text. This is because our interest in the text is linguistic, without regard to where the words appear on the tablet. Moreover, such clean up makes the resulting annotation more useful for machine learning purposes. However, depending on the annotation program you use it is often possible to include special comment lines at the top of the file preceded by a special symbol, such as ‘#’. Such lines can be useful in allowing you or a processing script to identify certain features of the text (such as publication information).
In general, we should understand that what to remove from an online edition of the text is a choice we need to explain when presenting the results of our annotations. If your project needs to treat these features of online editions differently, you may have to adjust later stages of your workflow accordingly. Note in general that it might be harder for you to read and understand the text if you remove markers of the physical aspects of the tablet (e.g. where the obverse/reverse begins, rulings, line breaks). Thus it is probably a good idea to have an edition of the text handy for you to consult while parsing the text.
Note also that unclear signs or partial words like {KUR}x and x+x-pa are still left in transliterated form with dashes and brackets to indicate which signs function as determinatives or go together to form a word. According to Assyriological convention, a single ‘x’ sign generally refers to one illegible sign on the tablet. You may wish to remove these tokens according to your needs. Sometimes the fragmentary tokens are still useful for linguistic annotation, particularly if they come with a determinatives. In that case one can often deduce the part of speech or semantic class of the original token, a useful piece of information for annotation. In our example, the fragmentary token {KUR}x has the determiner for a land or country. Thus we know to mark it as a (proper) noun during the annotation phase.
We need to make two more comments about the preprocessing stage. First, the above text file for SAA 5, 114 consists of one line, even though the text itself consists of multiple sentences. Keeping the entire text as a single line somewhat simplifies the annotation stage. But depending on the length of the text you are annotating or its particular layout, you may find it convenient to break up the text into several lines based on sentence breaks. This can make the annotation phase somewhat simpler since the annotation program we recommend below will regard each line as its own unit, allowing you to analyse the entire text piece by piece. An example of how this could be done is given below.
ana šarri bēlīya urdaka Gabbu-ana-Aššur
Urarṭaya emūqēšu ina Wazana uptahhir
o bēt pānīšūni lā ašme
Melarṭua māršu Abaliuqunu pāhutu ša {KUR}x x+x-pa adi emūqēšunu x x+x x x x x x x x x mātāti izaqqupu
šarru bēlī lū ūda
šarru bēlī lū lā iqabbi mā kî tašmûni mā atâ lā tašpura
In particular, if the text you are annotating is in verse form, where each line represents its own sentence, introducing such line divisions into the text file may be a judicious choice. Alternatively, introducing line breaks where the cuneiform tablet has a line ruling (indicating a strong section break) or where there is a clear shift in topics within the text (which tends to be represented in English translation by a paragraph indentation) can also be judicious. In general, however, the choice of where to break up a prose cuneiform text into sentences can be somewhat subjective. Furthermore, once you start annotating separate lines of a text you cannot easily ‘merge’ the lines back together (say, if you made a mistake in where to divide the text) without having to start over from scratch again. For this reason, we recommend being conservative in introducing line breaks in the text file.
If you are annotating multiple cuneiform texts, a good practice is to have each text in its own file, where the file is titled in a way that you (or the computer, if using a processing script) can easily identify what the text is. This may mean using numerical indices in the file names whose interpretation you record in a separate list. The image below illustrates this schema. It is a directory listing of many files, each of which containes a single cuneiform text in transcription. Each file is labelled with the P-number that uniquely identifies the text it contains within the CDLI catalogue.

Example of files names.
Alternatively, you can often put all of the texts in a single file, separated by empty lines and special comment lines identifying the text. Each approach has its advantages depending on your purpose for annotating and the tools you use. Generally if you are scraping your texts from an online repository it is easier to store them in separate files.
Making the Annotations
To create the annotation metadata for a text you need a program that will allow you to view the text and add special symbols and notation to it. By now there are a number of free programs aimed at humanists seeking to add all sorts of metadata to digitized texts, freely available for download or use online as a web application. Some of these programs are mainly used for highlighting thematic relations between passages or phrases in a text or for connecting entities mentioned in the text to an external specialized vocabulary such as a database of maps or biographies. In our case (doing linguistic annotations), you want to make sure your tool can annotate lemmas, syntactic dependencies, and morphological features at the minimum.
One very reasonable annotator program we recommend for Akkadian is Inception. It is freely downloadable as a Java applet that works directly through your internet browser. It is capable of handling lemmas, syntactic dependencies, and morphological feature specification in a fairly intuitive manner. The following screen shot shows what it looks like when annotating the normalized version of SAA 5, 114 introduced above.
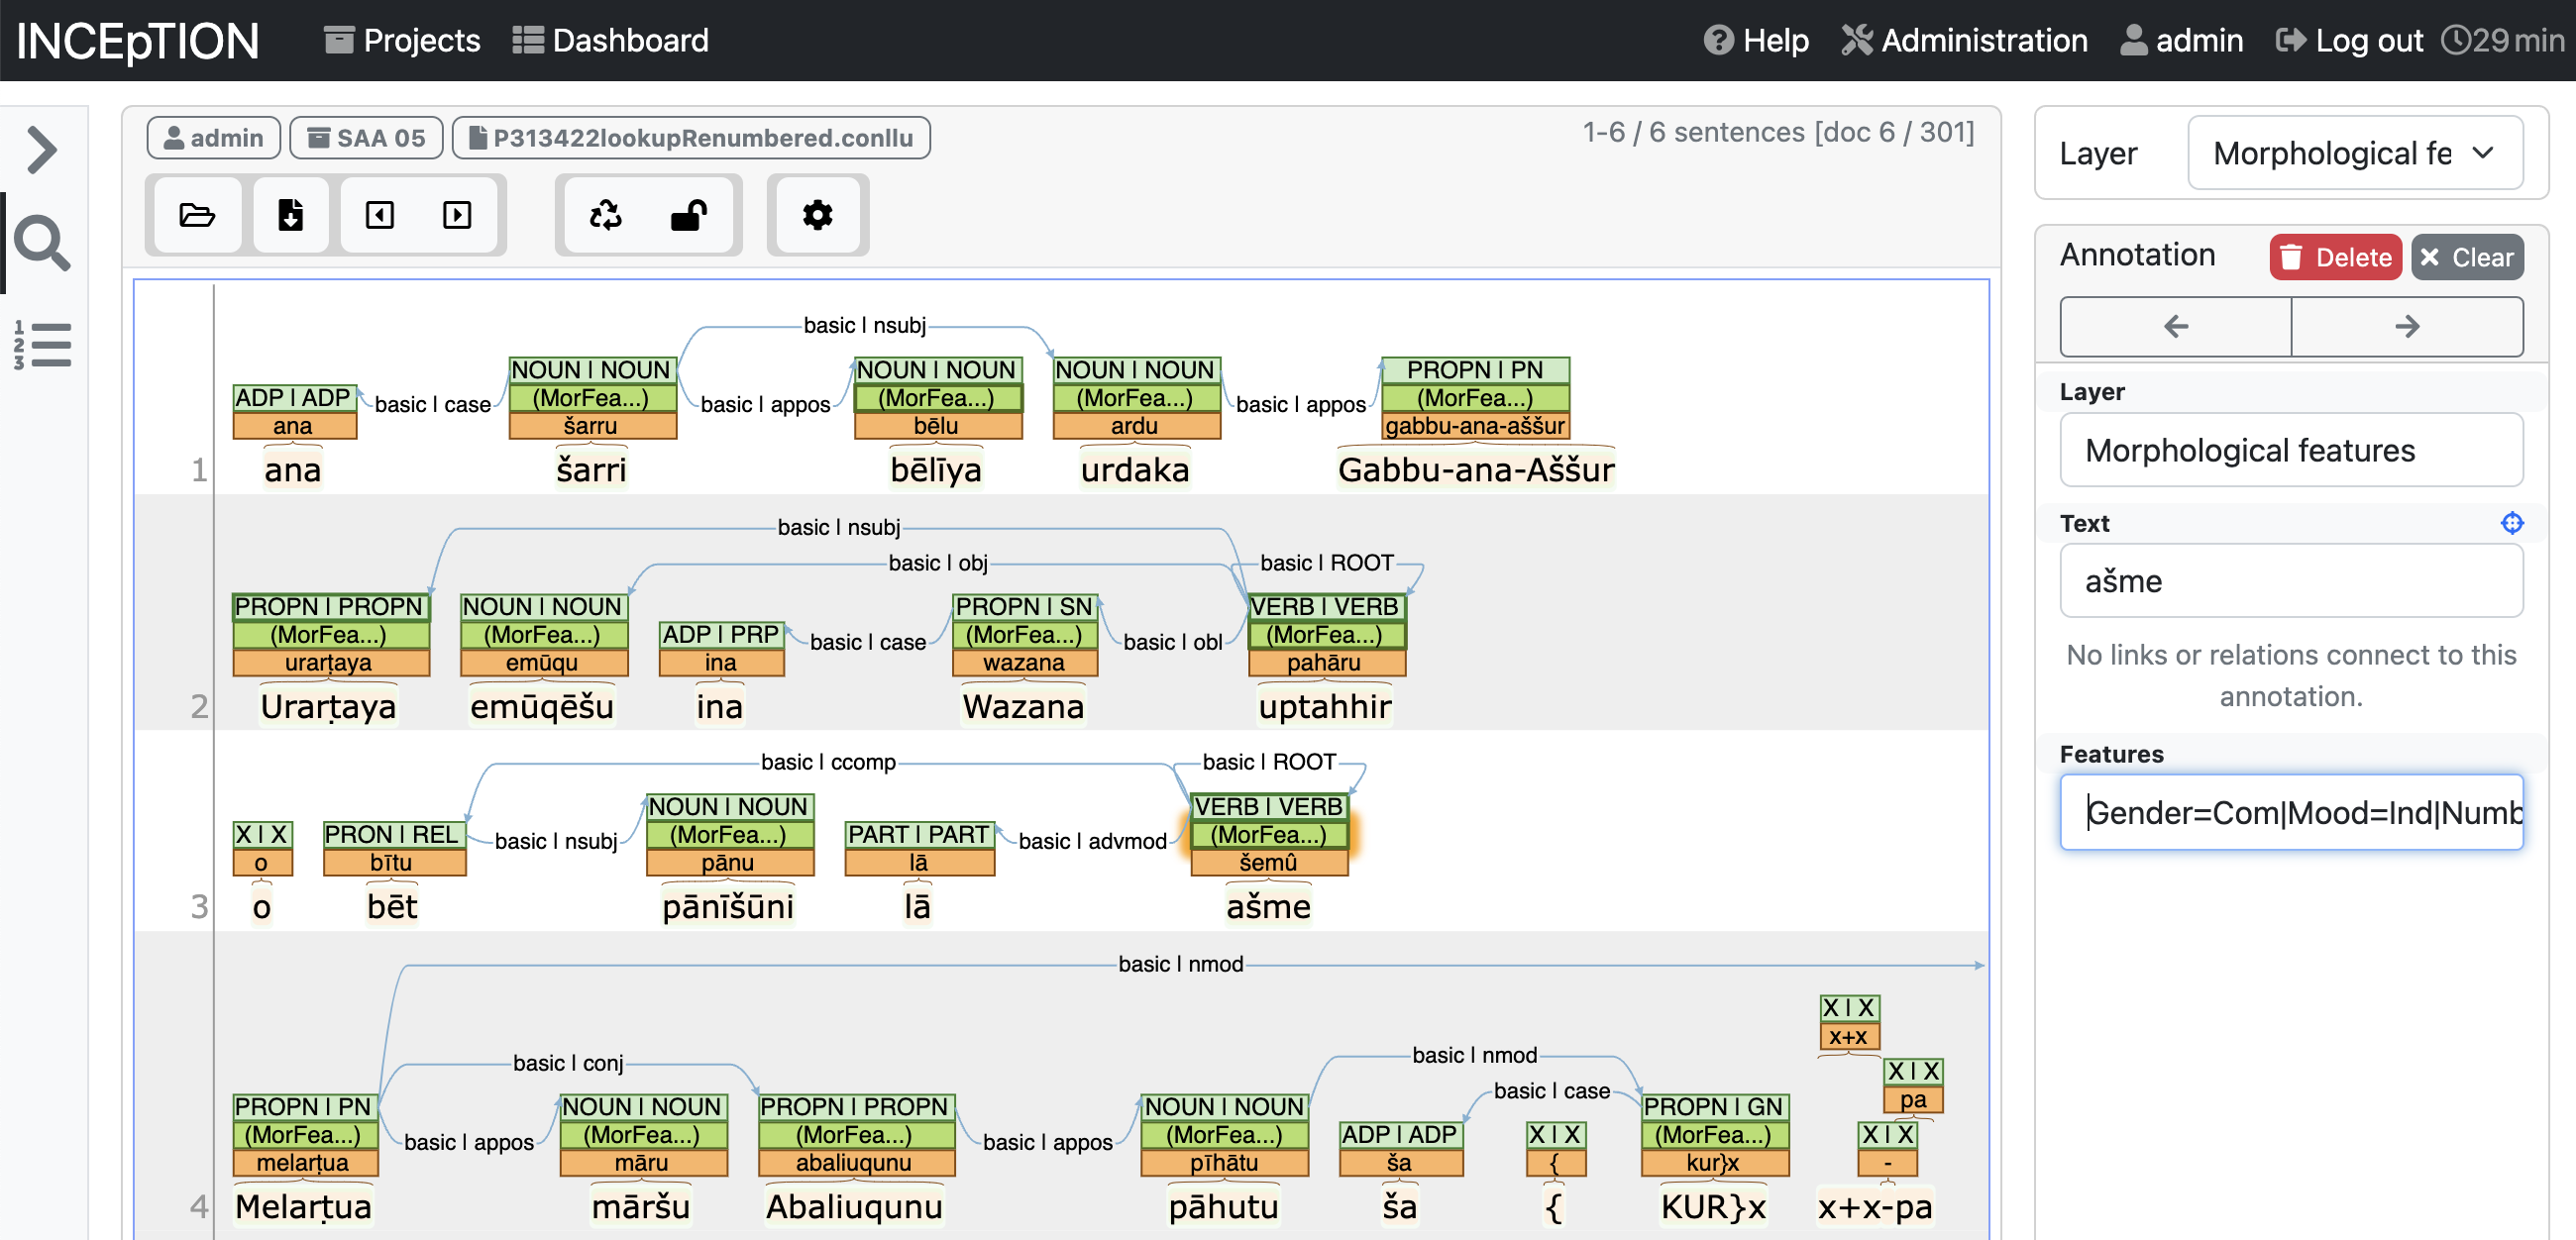
Annotating SAA 5, 114 in Inception.
The rest of this tutorial will discuss annotations done in Inception.
Generally, if you are doing your own morpho-syntactic annotations from the ground up, by hand, you start by importing the raw text file of the cuneiform text in transcription into Inception. This looks something like this:
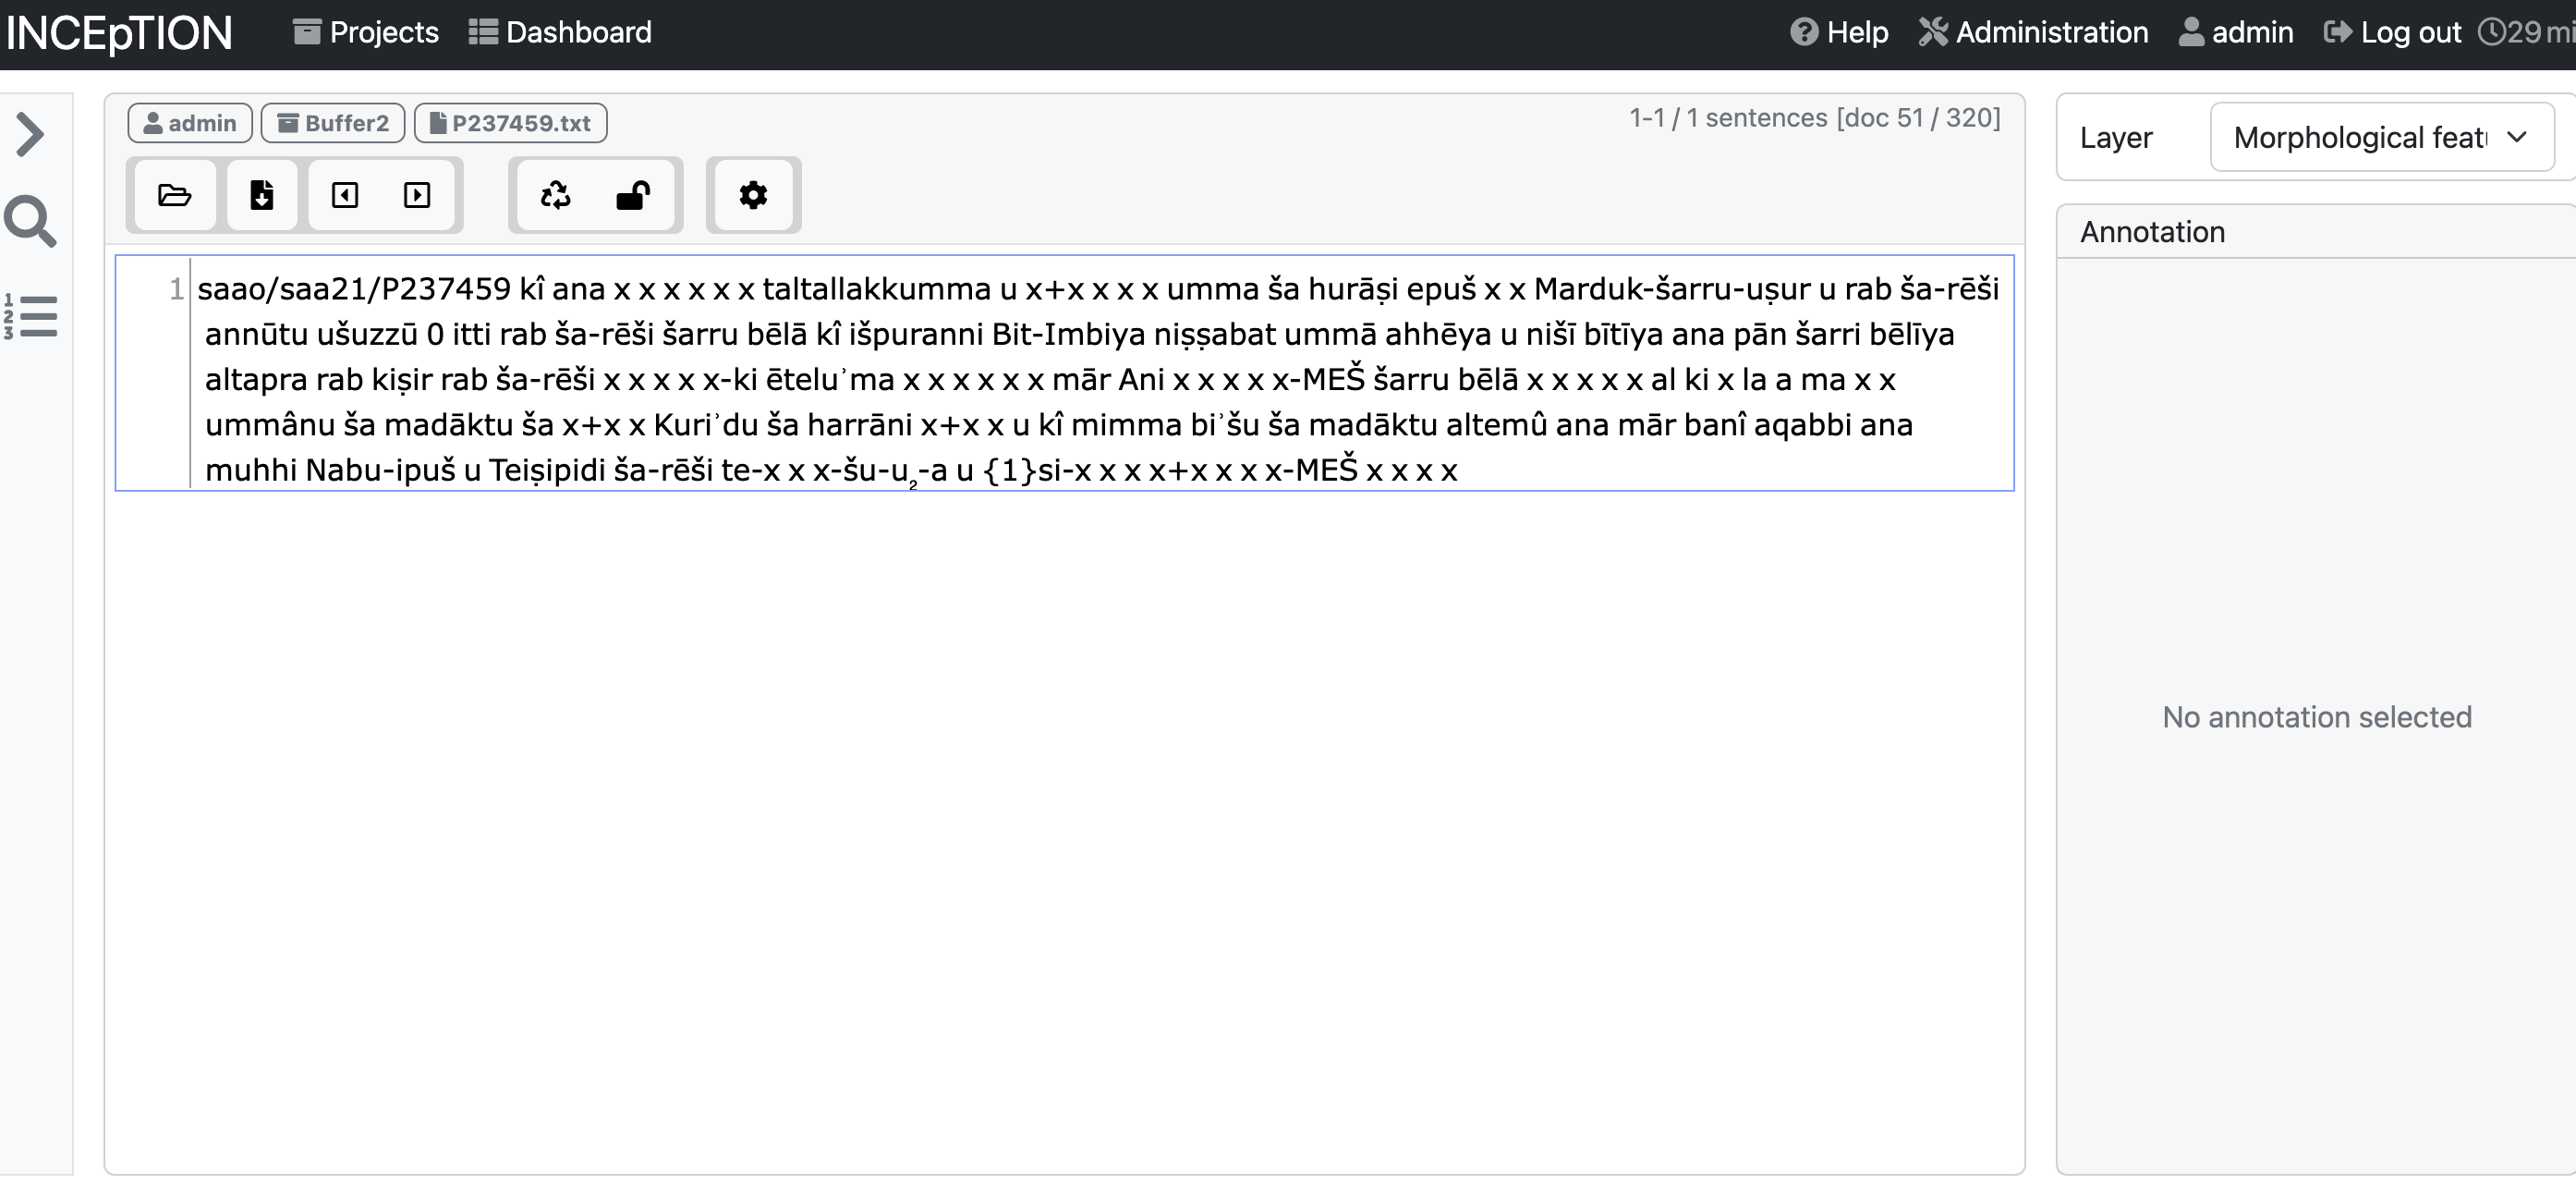
A raw transcription file imported into Inception.
Annotation layers
One should think of annotating a text as a collection of more or less disjoint labeling tasks. Each task can be thought of as applying a ‘layer’ of labels to all of the tokens of the text, and indeed, Inception uses the term ‘layer’ to describe the various annotation tasks you can use the program for (including custom labelling tasks). For the sake of efficiency, you want to tackle each specific labeling task in turn rather than trying to do them all at the same time. For example, you first go through and assign the part of speech tags to each token in the text. Then you go back and assign lemmas to all the tokens. Then you provide morphological parses for all the tokens, etc. This ‘serial-wise’ way of doing things in Inception is easier because you must switch layers in the graphical interface whenever you wish to switch from one labeling task to another.
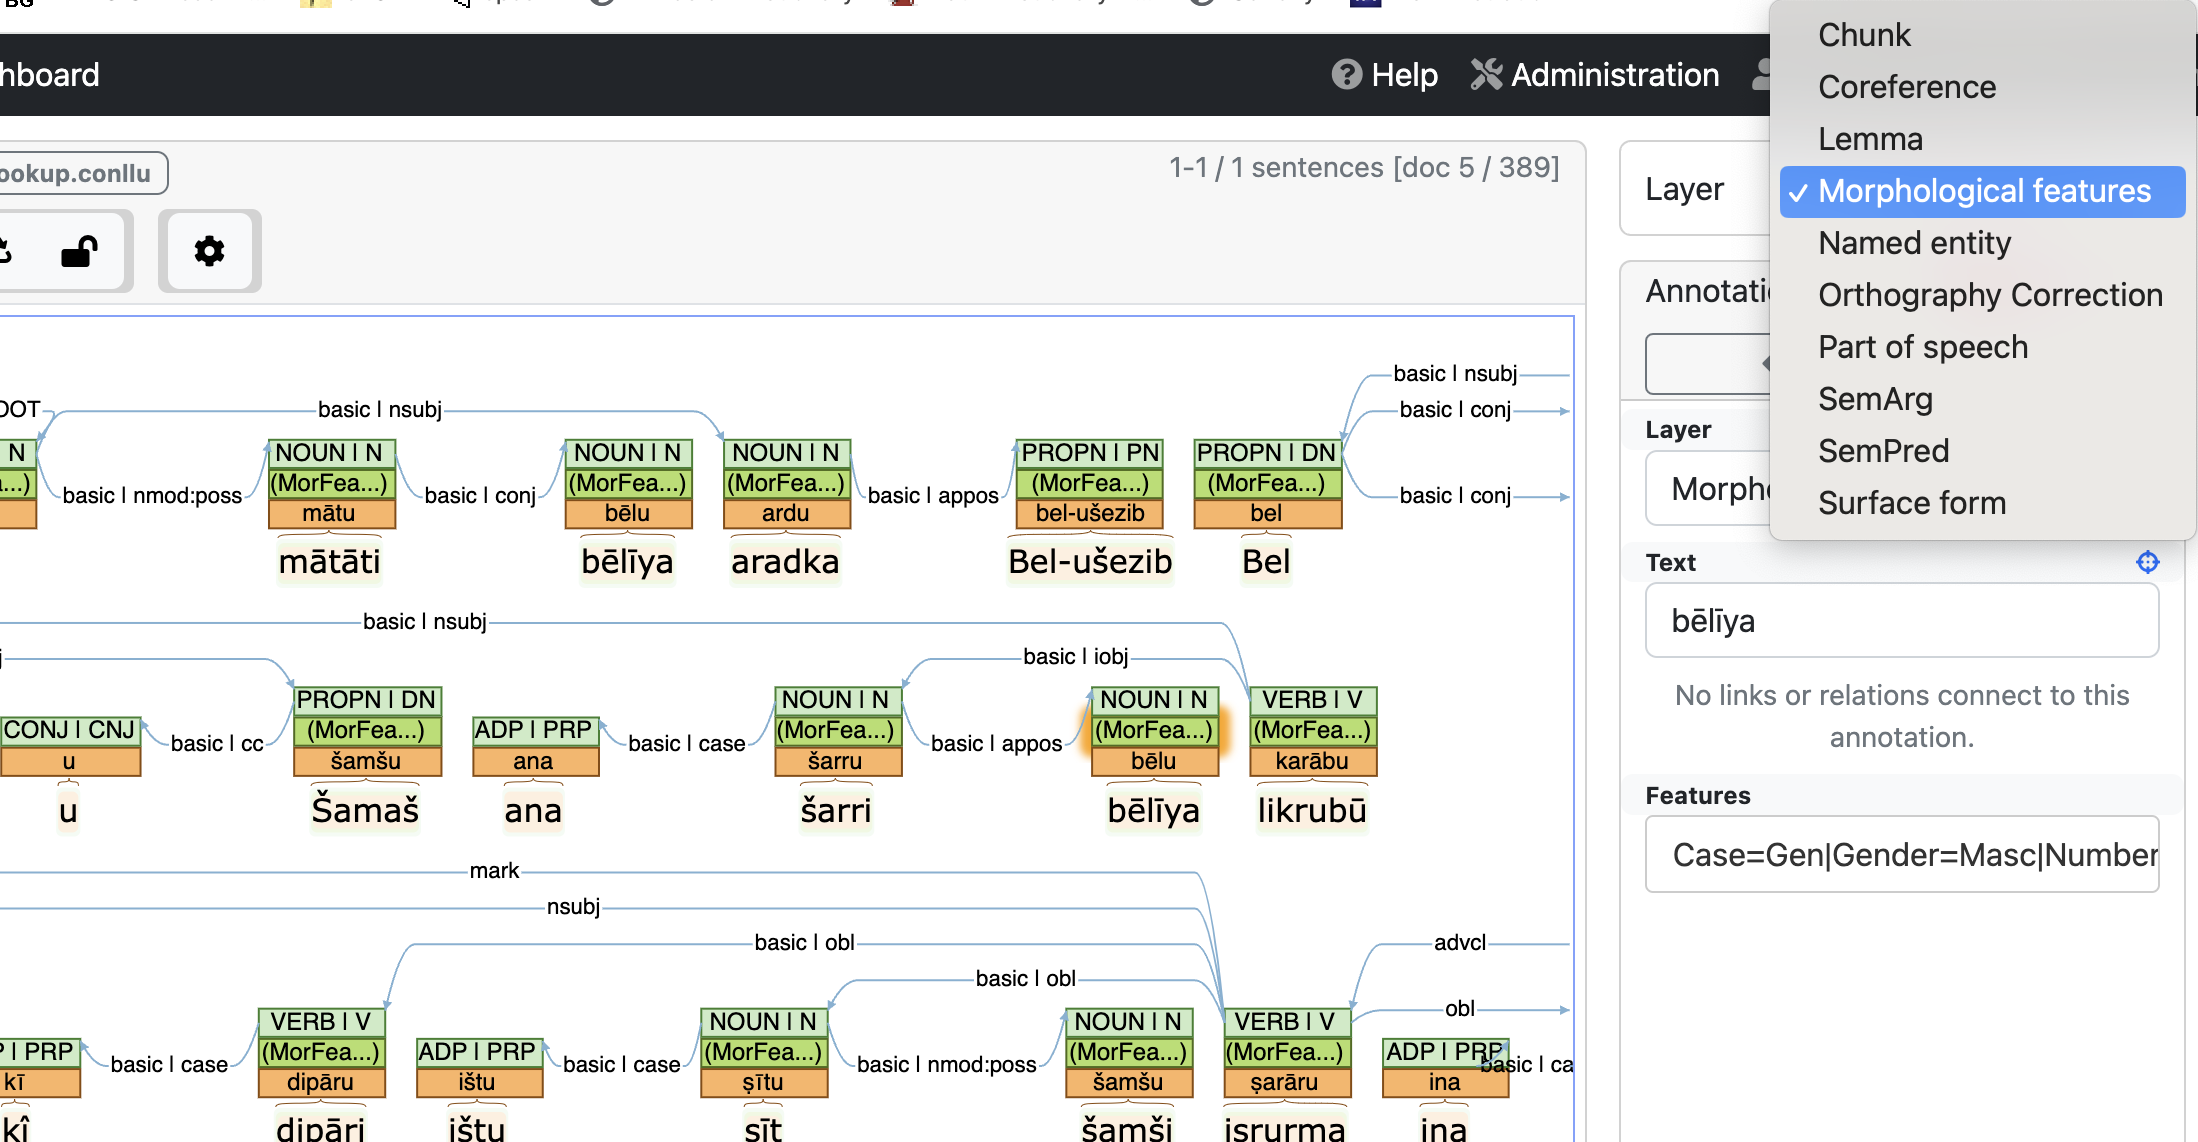
Visually, Inception displays the labels you apply as colored layers stacked above each token. In the SAA 5, 114 example above, the lemma for a given token is given in the orange box right above the token. For instance, the lemma for the form uptahhir is pahāru. Above that are the morphological parses, and then the part of speech tags. Syntactic dependencies are indicated by directed arrows among the tokens.
Some of the default layers used in Inception will now be discussed in turn.
Part of speech layer
Inception provides two fields for part of speech tags. The first is the universal part of speech tag (UPOS). It is based on the Universal Dependencies (UD) framework and is meant to apply for all languages. It appears on the left-hand cell of the part of speech tag above a token. The second kind of tag is provided for language-specific or more customized part of speech tags and is abbreviated XPOS. It appears on the right-hand side of the part of speech tag. In the case of Akkadian and Sumerian, a convenient set of XPOS tags to use is provided by Oracc and is listed here (along with corresponding UPOS tags).
Syntactic layer
In terms of syntax, Inception uses the UD framework because it is well-suited for working with many different languages. Unlike other grammatical formalisms, UD is based on the idea of syntactic dependency. Syntactic dependencies indicate grammatical dependencies among words and phrases such as subject and object of a verb, an adjective modifying a noun, or a conjunction connecting two full sentences. Overall, one makes semantically ‘light’ terms like prepositions and particles dependent on semantically more important terms like nouns and verbs. Syntactic dependencies are asymmetric relations between two words or phrases, one of them being the head and the other the dependent. One may think of annotating the syntactic dependencies of a sentence as essentially constructing a directed graph or tree, where the dependencies between tokens in a text are expressed by directed arrows. Inception reflects this fact visually in an intuitive manner.
In the second sentence within the SAA 5, 144 example figure, there is an arrow going from the verb uptahhir to the noun Urarṭaya ‘the Urartian’. The arrow’s direction indicates that the noun is dependent on the verb, and the label ‘nsubj’ indicates the noun is the nominal subject of the verb. Creating such a dependency is a simple manner of selecting the Syntax layer and drawing an arrow from the head token to the dependency token. You select the label for the dependency in the lower right.
Although the program will not prevent you from doing so, it is considered semantically anomalous in the basic UD framework to have a form syntactically dependent on more than one head form. This is because of what syntactic dependence means in UD (putting aside the so-called enhanced dependencies system). In Inception, this anomaly would be represented by having arrows from two different forms leading into a third. Although the program will not prevent you from doing this, such ‘improper’ graph structures will not only be unclear to human readers, it will also create problems for machine learning algorithms using your annotations for training data. You should thus strive to avoid making such mistakes in your annotation (remembering that it is perfectly normal for a single form to have multiple forms dependent on it, i.e. to have multiple arrows leading out of it). A more subtle problem arises when you have a cycle in your annotations, i.e. where there is a chain of arrows starting from one form and ultimately leading back to the same form. This type of error can arise when you are annotating a very complex or long sentence. It, too, creates problems for machine learning algorithms but can be hard to discover until you gain experience in ‘reading’ Inception dependency graphs.
Note also that because most cuneiform texts do not mark sentence divisions, it is up to the annotator to decide whether they want to indicate sentence divisions at the layer of the base text file (by separating the text into separate lines) before annotating. If you wish to annotate the whole text in Inception without first making line breaks, the only clear marker of sentences or clauses will be where one annotation graph stops and the other begins. In other words, sentences are defined graph-theoretically by connected components. What you should remember is if you have broken your base text into separate lines (where each line represents its own sentence), you cannot draw arrows across sentence boundaries in Inception. If you initially made a line break in the text thinking it was a sentence boundary but while annotating realize you made a mistake, you cannot easily undo your mistake. You must either go back and fix the base text and start annotating from scratch again, or tolerate the error in Inception and continue. For this reason, it is sometimes better to be conservative and not make breaks in the underlying text unless you are sure there is a sentence break.
Morphological layer
When doing annotations for morphological forms in Inception, you should think in terms of feature-value pairs. A feature is a certain grammatical or semantic category such as grammatical number or gender, verb tense, or definiteness, and a value is what variant of the category the word expresses via a particular morpheme. Thus in the English word cats, the plural suffix -s signals the value ‘plural’ within the category of grammatical number. In liked, the -d suffix indicates the value ‘past’ in the category of tense. In Inception, a morphological parse for a token consists of a text string made up of feature-value pairs, where a given pair consists of the feature label on the left, the value label on the right, and an equal sign joining the two sides together. Examples include ‘Gender=Masculine’ or ‘Tense=Past’ or ‘Subjunctive=Yes’. The feature-value pairs are concatenated together by the bar sign ‘|’. For example, a noun in Akkadian might have feature-value string ‘Gender=Masculine|Number=Singular|Case=Nominative’. For cuneiform there are currently no strict conventions for what label sets to use for morphological annotation. However, if you wish your annotation scheme to be compatible with other annotation projects, you should check to see what they use and match their schema (or establish some one to one correspondence in labels) before beginning annotation.
In Inception, feature-value strings are input on the right side of the screen once you’ve designated a token for morphological annotation. In the second sentence of the SAA 5, 114 figure, you can see the Features window showing the morphological feature specification of the form uptahhir. It begins ‘Gender=Masc|Mood=Ind|…’, which means the form is masculine and in the indicative mood. Inception conveniently remembers the most frequent strings you input in the morphological feature specification window, and will show them to you via a drop down menu as you type. Another way to save time and labor when inputting feature-value strings is to maintain a simple text file listing the most common strings you use during annotation. You can then copy and paste these strings into the window as needed.
The Output File
After you have finished annotating a text in Inception you need to output the results to a file. Inception allows for a number of output formats, one of them is CONLLU-format. This format conveniently represents the lemmas, syntactic dependencies, and morphological features. A CONLLU-file is a text file where each row represents a single token, and with ten tab-separated columns, each of which specifies linguistic information about that token. The details of the encoding are found at the Universal Dependencies website.
The CONLLU file for the annotation of SAA 5, 114 looks as follows:
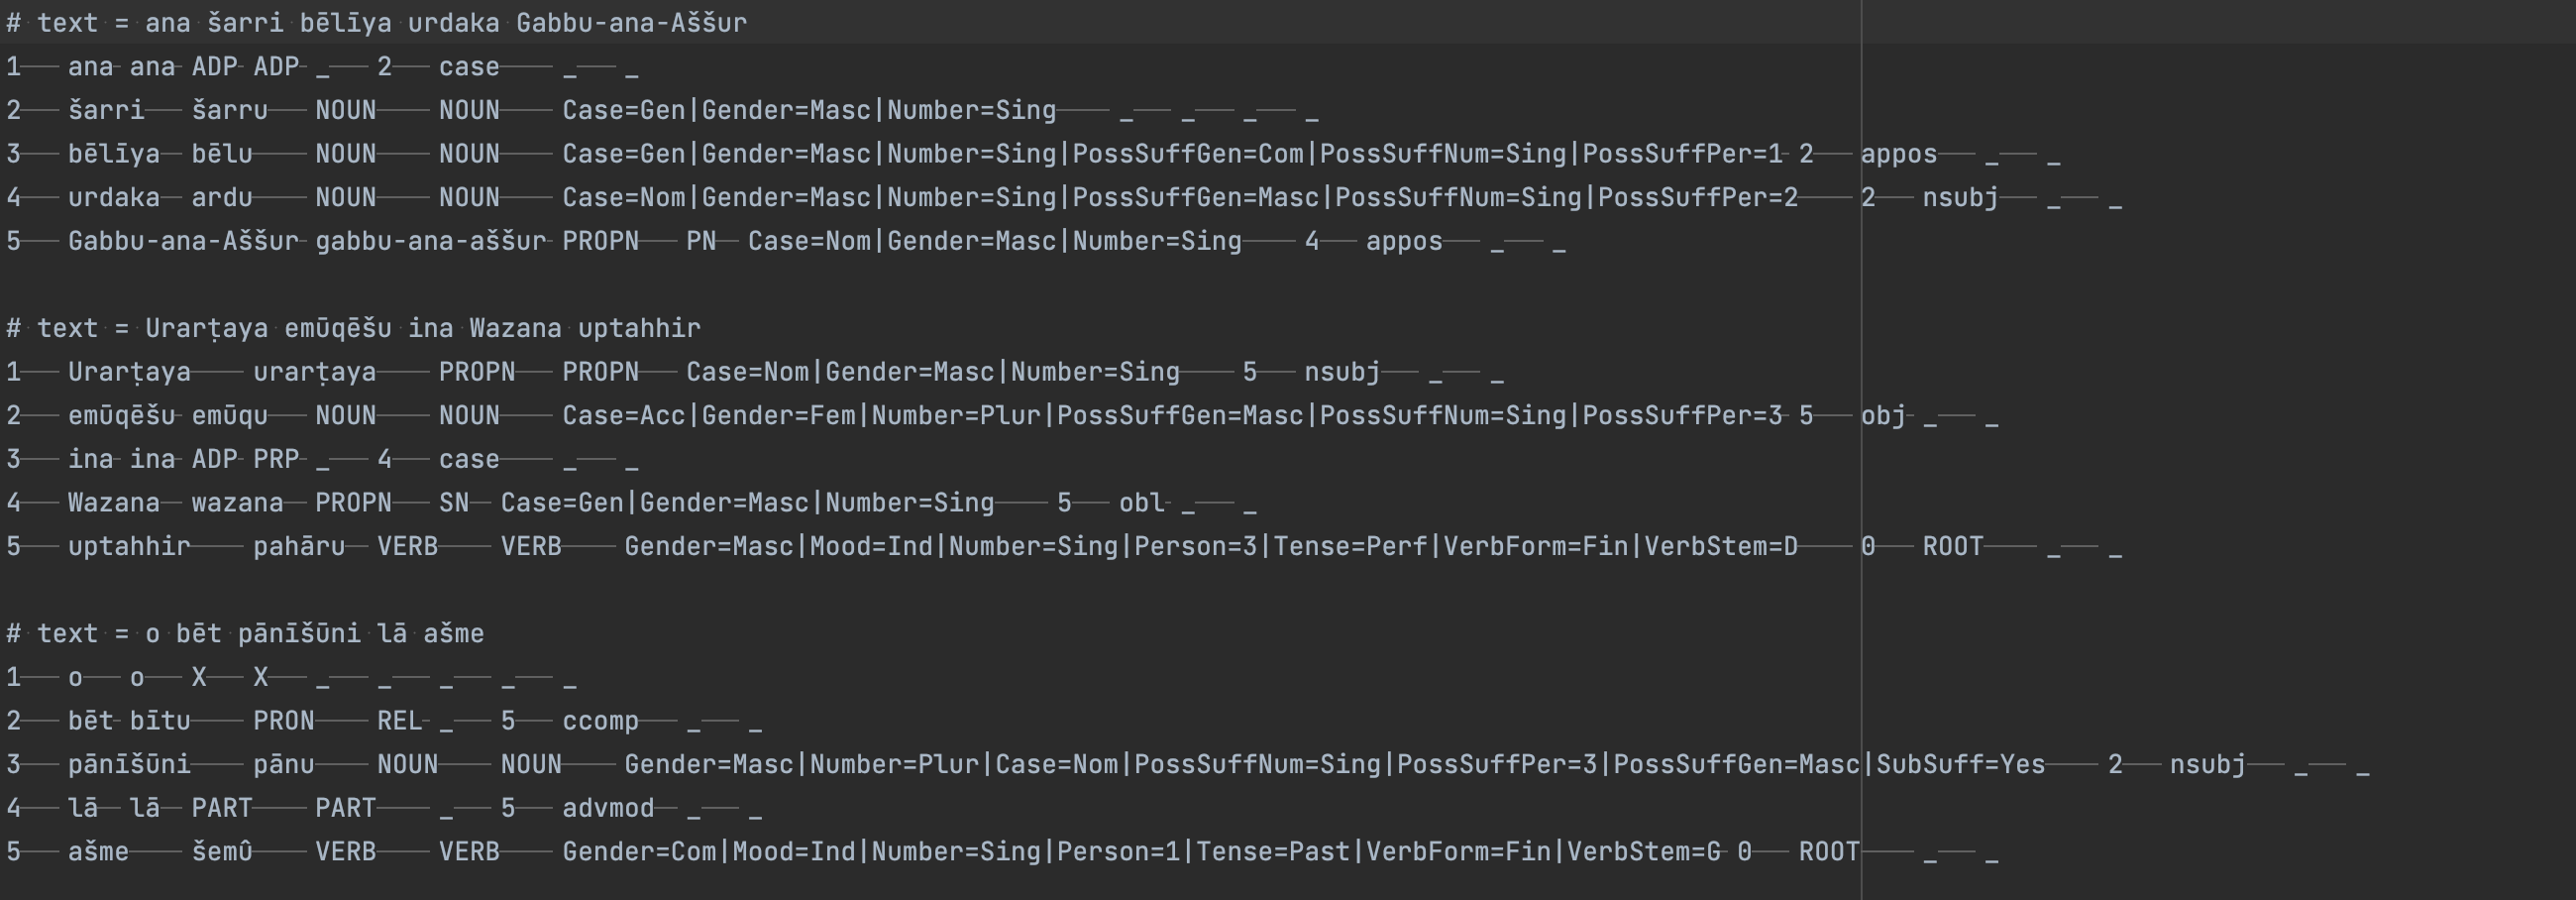
CONLLU file for SAA 5, 114.
Note that the CONLLU format encodes token position within a sentence in the first column. Dependency relations are given in the seventh column, and dependency type in the eighth. Thus for the second sentence, the fourth row represents the token Wazana, while the fifth row represents uptahhir. The seventh column of the fourth row has value 5 and the eight column is ‘obl’. That means the token Wazana is syntactically dependent on token uptahhir and the dependency relation is oblique.
You must take care when reading a CONLLU file that you remember the seventh column represents the syntactic head, not the dependent. These are easy to confuse!
If your initial text file was broken up into several lines, the CONLLU file output by Inception will consist of multiple ‘blocks’ of indices each starting with 1. Header information and comments are indicated by lines starting with ‘#’. This is illustrated below.
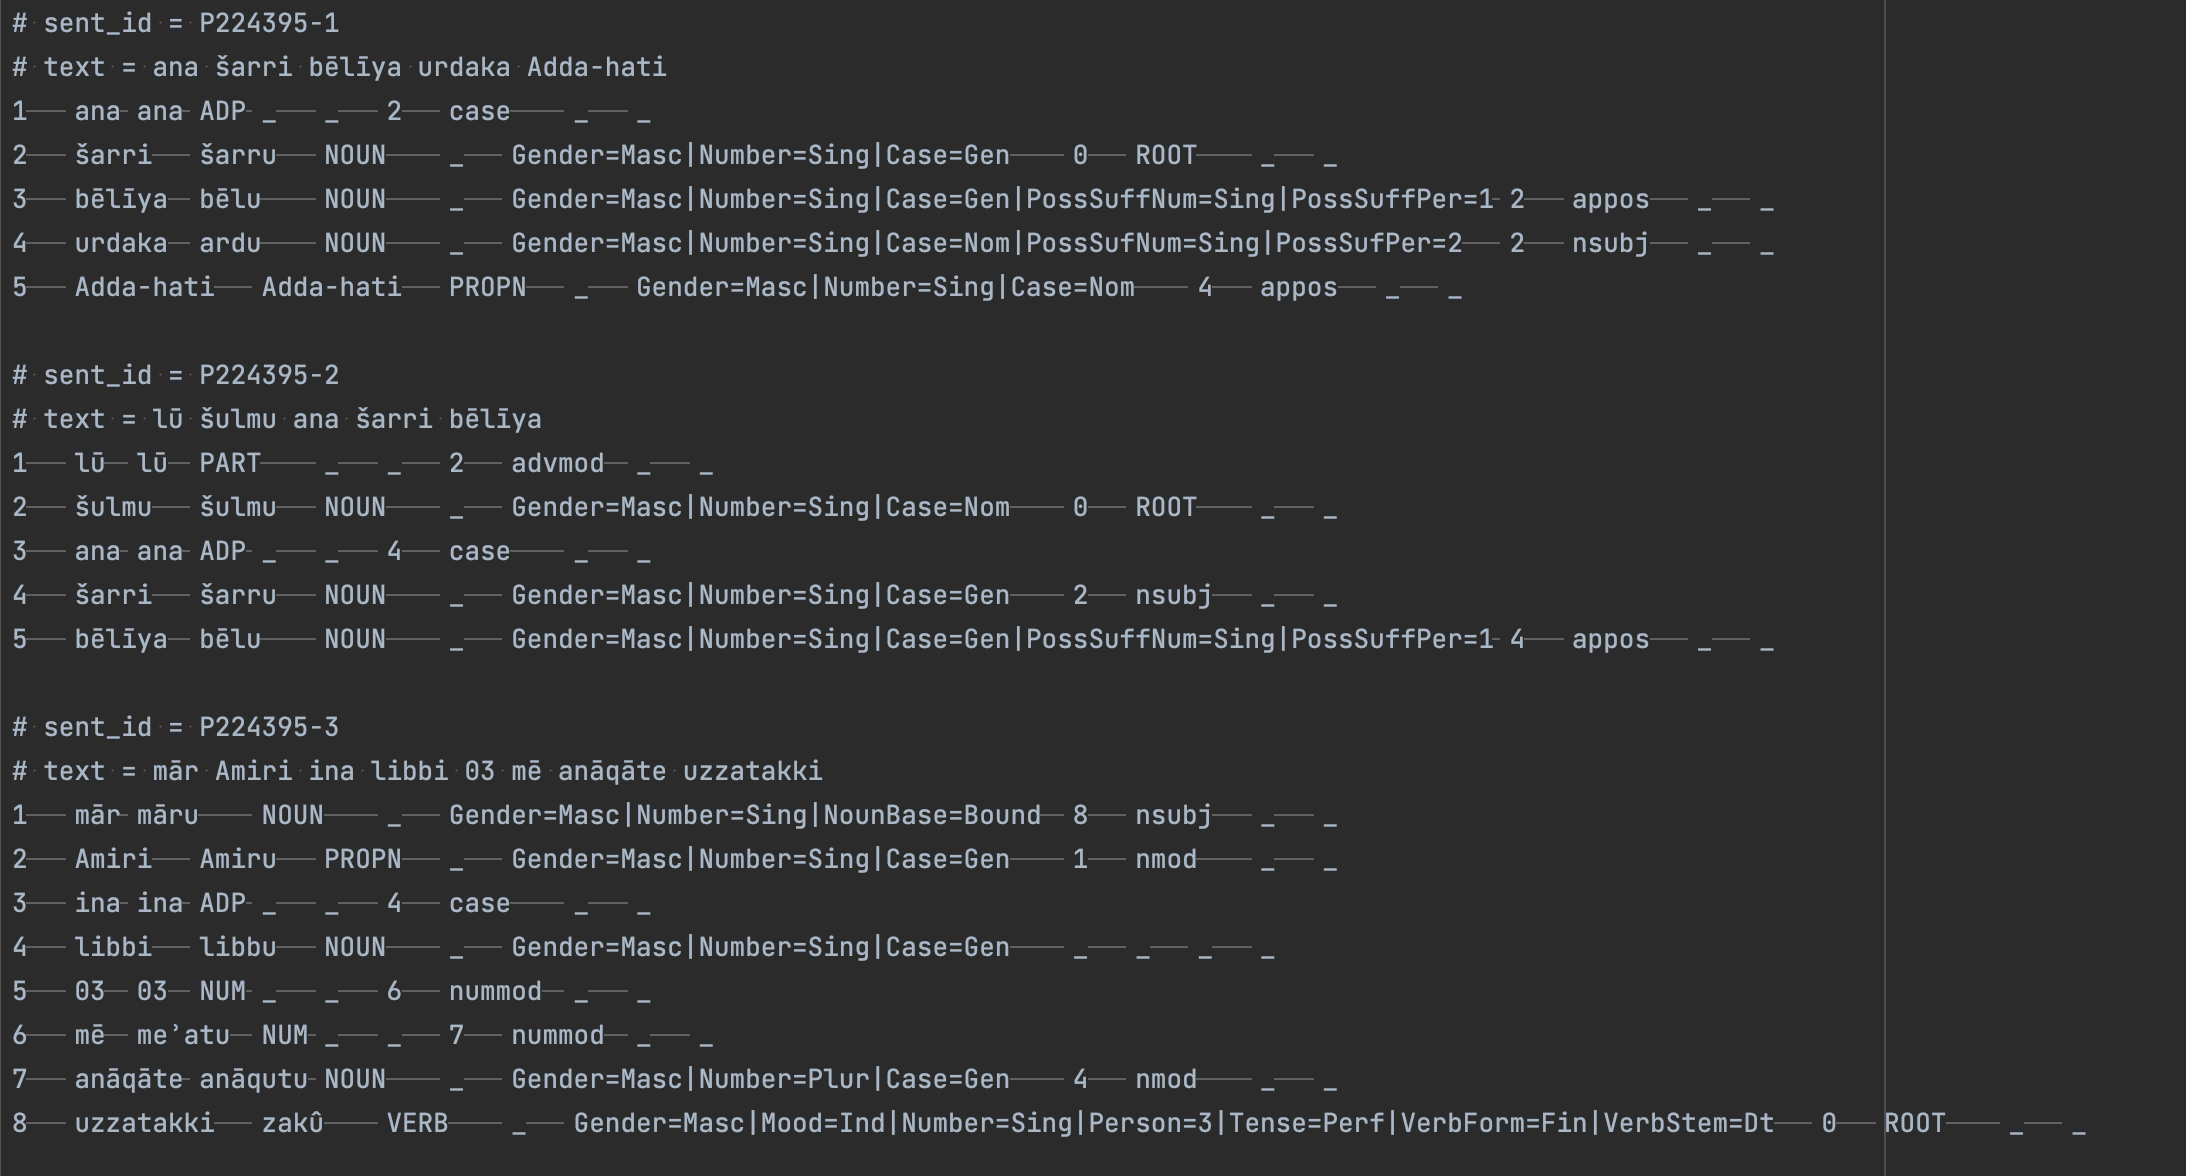
CONLLU file representing multiple sentences.
Your CONLLU file can itself be imported into Inception for further annotation, become part of a growing treebank project for your language, or serve as training data for a suitable language model.
Issues to Consider When Annotating
Let us step back a minute from Inception and Akkadian, and speak about annotating in cuneiform more generally. If you have not previously annotated a cuneiform text in the specific language at hand it would be good to check how others have annotated in that language, both in the hopes of making your work compatible with theirs, as well as becoming familiar with the difficulties they faced in applying their annotation scheme. Unless you are highly experienced with the language using modern linguistic categories, you may find that your initial label set for morphological features turns out to be insufficient, or your understanding of a certain syntactic structure turns out to be wrong (or at least problematic). Looking at what others have done may save you time and effort in the long run. At the same time, no annotation scheme currently used for a cuneiform language fits the grammatical particularities of that language perfectly, whether at the level of theoretical description or practical implementation. Depending on the type of text you are working with, you may find yourself deviating from the conventions of other annotators or even needing to invent conventions yourself. What is most important is that you have reasons you can cite for what you do and that you explain those reasons somewhere in the documentation that accompanies your work. Such documentation often consists of a text file or Markdown file that is meant to accompany the annotation files and processing scripts you bundle together in an online repository such as GitHub (see under Choosing How to Store Results). Being explicit in this file about the corpus you are annotating, the morphosyntactic label sets you use, and use of your various scripts will improve the utility of your work. Not only will it be easier for others to understand and replicate what you did, it will also help you to remember your own policies at a later date and to be consistent in your work.
Here are some examples of projects that use linguistic annotations in different languages written in cuneiform: on Anatolian languages like Luwian and Hittite see the eDiAna project and Hittite Festival Rituals, respectively; for Akkadian, Sumerian, Persian, and Urartian see the ORACC lemmatization guidelines, and for Sumerian specifically see the ETCSL project conventions. The article of Luukko, Sahala, Hardiwck, and Linden 2020 outlines a morpho-syntactic annotation scheme for some Neo-Assyrian royal inscriptions, while that of Ong and Gordin 2024 addresses annotation of Neo-Assyrian letters using a spaCy language model. Consulting the last two examples in particular can give you an idea of what the entire annotation workflow for Akkadian consists of.
A second issue is whether to approach annotation sub-task by sub-task or document by document. If you intend to annotate many documents for several features (e.g. syntactic dependencies and morphological dependencies and lemmatization), you can either annotate all of the documents for a single feature first, and then go back and go over the documents for the second feature, etc., or you can do all of the features for a single document while it is still in front of you before going on to the second document, etc. Depending on the tools and knowledge you bring to your work, one method may be more efficient than the other. If the syntactic dependencies of a corpus are particularly difficult to do, you may opt to first go through and do the morphology before tackling the syntax alone. If you are working with someone who does not know the grammar of the language well but can find the lemmas for all the tokens in the text on their own, you could delegate the task of lemmatization to them while you do the dependencies and morphology. While these kinds of considerations are relevant to annotating many sorts of languages beyond cuneiform ones, in the case of cuneiform languages there is one thing to keep in mind. Unless the type of text you are annotating is particularly simple morphosyntactically, it will likely take you some effort to understand what the text is saying even in transliteration (or normalization). Thus, going over the text multiple times for different annotation tasks may be less efficient that doing everything at once while the meaning of the text is still fresh in your mind.
Finally, be aware of accompanying datasets or machine learning tools that can accelerate your work. If your transliterations come from an online database such as Oracc, they may also come with lemmatization data as part of a JSON file or separate glossary. If you already had to extract the raw text from such a JSON file, it is only a little more work to grab the lemmas that go with the tokens as well. Similarly, if you are making annotations of a corpus to train a natural language processing model on it (say a syntactic parser or morphologizer), you can actually start training your model on the portion of the corpus you have annotated early on and then apply its predictions to the rest of the corpus. Going through and correcting the model’s predictions is often faster than going through the whole raw corpus unaided. This technique, known as bootstrapping, is particularly effective when repeated multiple times, early on, for a large corpus.
Choosing How to Store Results
Unless you are annotating cuneiform texts for private purposes and do not want to share your data, you should consider how to make your work available to others on the internet. GitHub is an online platform mainly designed for people writing code they wish to share with others in a controlled, version-specific way. As an annotator, you can use it as a convenient place to store your data and any associated processing scripts, keeping your data project private, open to all, or only to invited users. The system is designed to synchronize with particular folders on your local computer, so that the process of backing up data or uploading newer versions is easy and allows you to compare current and older versions of files. GitHub is a good place to provide your data if you envision yourself working on multiple projects in the future, or if you have scripts or other associated code that you need to present alongside the annotations themselves.
If you have annotated your texts in the Universal Dependencies format, you can also make your data available on the UD website (which actually stores its data on GitHub) alongside annotated corpora from dozens of other languages. You do need to make sure your annotations conform to their format specifications, which are more strict than what has been discussed here. This website already features corpora of Akkadian, Biblical Hebrew, and Hittite, and its general purpose is to facilitate multi-lingual corpus research.
A third alternative is Zenodo, a site for publishing academic datasets. The datasets you publish there are linked to your personal account or those of your work group.
Final Observations
While annotating itself has some immediate uses, it is often done as part of a larger language processing task, research program, or pedagogical project. We mentioned some of these uses earlier on, among which were applications to machine learning and language model development. The challenges of applying machine learning and developing language models for cuneiform languages are somewhat different from someone working on English. There are fewer pre-existing annotated corpora that one can use to jump-start one’s own annotations. Many natural language processing packages assume that you are interested in working with a popular modern language, and often come with large datasets from those languages built-in, without clearly explaining how to apply their code to a low-resource language starting from the ground up. You will likely find it very helpful to have guidance from someone more experienced in natural language processing or data science, or to look at some of the online proceedings from NLP workshops aimed at humanists and specialists in less common languages. One recent workshop at Princeton illustrates how to develop an NLP project for new languages using spacy. On a broader level, one may also consider the Digital Humanities Summer Institute with its various course offerings. What may be the most helpful in the beginning, however, is finding someone else who has begun an annotation project in your language by searching GitHub and getting guidance from them.